Looking for a quick and easy way to clean up push notifications subscriber lists?
Cleaning up your list from time to time helps you get better insights on how your campaigns are actually performing. You can also save a lot of money by getting rid of subscribers who simply never respond to you.
The cleaning feature isn’t standard for all push notification services. Even if you get the feature, you might not be able to use it without using their API service. Which means that you’ll need a developer to do it for you.
If you have an in-house developer, that’s fine. But if you don’t, we highly recommend shifting to PushEngage. PushEngage allows you to filter and delete subscribers in a few simple clicks.
In this article, we’re going to show you step by step how to clean up push notifications subscriber lists.
Why Should You Clean Up Push Notifications Subscriber Lists?
Your push notifications subscriber list is a list of all the website visitors who opted for your push notifications. While it feels really nice to watch your list grow, you also need to keep an eye on who is subscribing.
Most push notification services will charge you for the number of subscribers you collect. So, if your list is full of subscribers who never click on your notifications, never even view them, you’ll end up spending a lot of money for no reason at all.
Then, there’s the matter of understanding push notification performance metrics. If you have a ton of subscribers who don’t engage with your push notifications, you’ll end up with extremely low click rates, view rates and conversion rates.
But that’s severely misleading. Your push notifications may be super effective for subscribers who are genuinely interested in your brand.
The same issue occurs with push notification A/B testing.
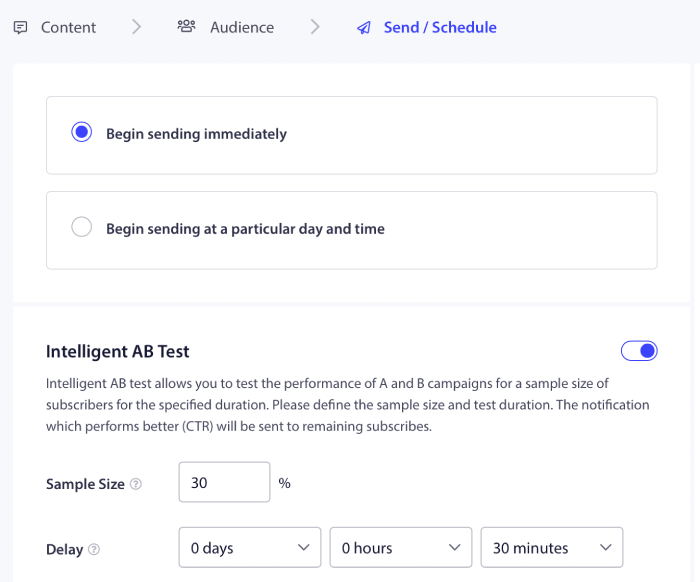
If you send out a really good notification to a bunch of subscribers who won’t open your notifications anyway, then it messes up the testing process. So, instead of increasing your click rates, you’ll end up driving your engaged subscribers away.
Does Your Push Notification Service Allow Subscriber Cleanup?
Not every push notification service allows you to clean up push notifications subscriber lists. At least, not directly. Sometimes, you can do it using their API service. But that’s difficult to do if you don’t have an in-house developer.
A good way to verify is by simply asking your service provider if they have a cleanup option. But chances are that they won’t have one with accessible options.
We recommend that you switch to PushEngage right away.
PushEngage is the best push notifications service in the world. And we’re not just talking about the free version. It allows you to connect with visitors after they leave your site with targeted push messages.
PushEngage is our first choice for push notification serives and tools because it’s:
- It’s so easy to use
- Effective on HTTP and HTTPS sites
- Comes with a visual builder which requires little to no coding to set up
- Easily set up fully automated push notification campaigns for any kind of site
- Has multiple options to send personalized push notifications for higher click rates
- Equipped with custom goal tracking, UTM parameters, and advanced analytics
And this is barely scratching the surface. Check out PushEngage’s full list of features before you go any further.
The most incredible part about PushEngage is that it has a forever-free plan that you can try out before making a purchase decision.
PushEngage’s free plan is good enough to get your business to a point where you can easily afford the paid plans that start at $9/month for 100,000 subscribers.
The overall switching cost is pretty low. So, we highly encourage you to switch to PushEngage right away. The cleanup feature isn’t the only reason to buy a PushEngage plan. You get a lot of advanced features that other push notification tools simply don’t offer.
How to Clean Up Push Notifications Subscriber Lists
Now that you’ve switched to PushEngage, it’s time to clean up your push notifications subscriber list.
If you’re using the WordPress plugin, go to your WordPress dashboard and navigate to PushEngage » Audience » Subscribers and click on Clean up the List:

And if you’re not running a WordPress site, you can go to the PushEngage dashboard and go to Audience » Subscribers to get the same options. You can remove subscribers who didn’t receive, view, or click on your notifications for any number of days.
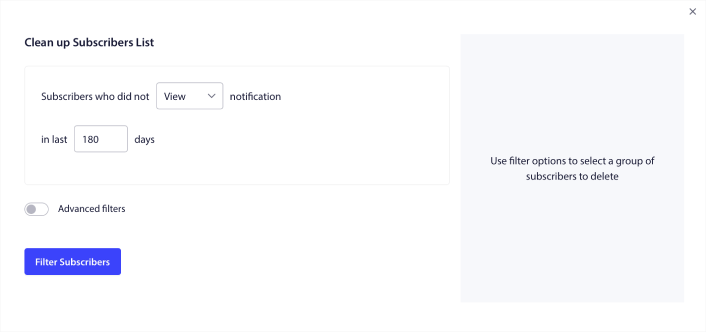
We recommend deleting subscribers who haven’t viewed your notifications in 240 days. You can also use advanced filters for even more specific removals.
Advanced filters include:
- Attributes: Delete subscribers with specific attributes such as platform or other identifying data.
- Segments: Delete an entire segment or a set of segments
- Browser: Delete subscribers from a specific browser.
- Device: Delete subscribers who engage from desktop or mobile devices.
- Country: Delete subscribers from a specific country.
- State: Delete subscribers from a specific state.
- City: Delete subscribers from a specific city.
- Subscription date: Target those who subscribed before or after a particular date. Great for retargeting new subscribers who aren’t engaged.
- Last sent: Target subscribers that last received a notification before a specific time limit.
- Last view: Target subscribers that last viewed a notification before a specific time limit.
- Last click: Target subscribers that last clicked on a notification before a specific time limit.
- Total sent count: Target subscribers whose total lifetime notifications received is less than or equal to a specific count. Great for targeting subscribers who don’t even receive your push notifications anymore
- Total view count: Target subscribers whose total lifetime notifications viewed is less than or equal to a specific count. Meant for targeting subscribers who receive your notifications, but don’t even check them out.
- Total click count: Target subscribers whose total lifetime notifications clicked on is less than or equal to a specific count. Filter subscribers who don’t click on your notifications at all.
- Subscriber hash: Meant to remove a particular subscriber from your list. It’s similar to deleting an email from a list.
Individually, these filters may not make a ton of sense. But, you can combine multiple filters to select specific audience members. For instance, let’s say you want to remove subscribers who have been subscribed for over a year but never once clicked on your notifications. You can combine the Subscription date filter with the Total click count filter.
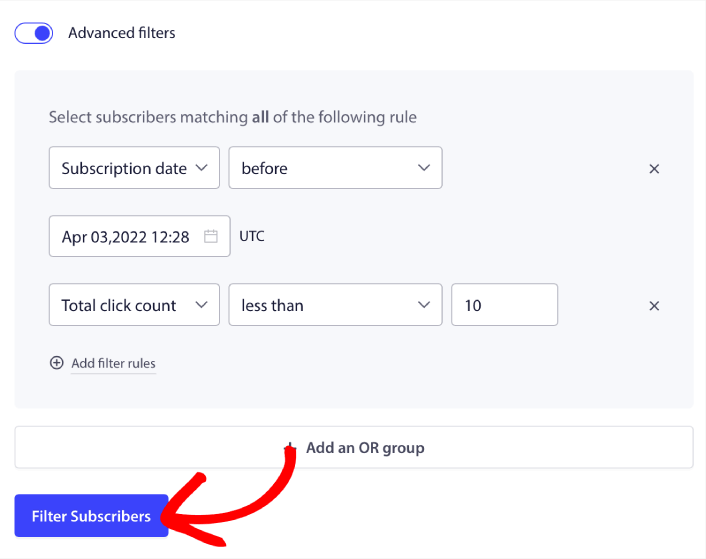
And if you want to filter multiple types of inactive users, you can click on the + Add an OR group button and target multiple types of users.
What to do After You Clean Up Your Push Notifications Subscribers
After you clean up your push notifications subscribers, you can simply get back to optimizing your push notification campaigns and growing your business.
We also suggest that you take some time to read our articles and learn how to supercharge your automated push notifications. Start with our article on push notification best practices.
If you’re new to push notifications, you should follow a full-blown push notification testingprocess before you go live. It’ll help you troubleshoot common issues before your visitors see them and start complaining about a broken user experience. And most definitely you should set up Google Analytics to track push notifications.
Retargeting push notifications to target the subscribers who clicked on them or didn’t. Let us know how that works for you. In the meantime, check out these resources:
- How to Boost Clicks on Your Push Notifications With Curiosity
- How to Personalize Each Push Notification
- How to Stand Out With Rich Media in Your Push Notifications
- How to Reactivate Dormant Push Subscribers
- How to Use Push Notifications to Keep Customers Informed
- How to Use Emojis in Your Push Notifications for Higher Click Rates
- How to Increase Conversions by Creating a Sense of Urgency
And if you haven’t already, get started with PushEngage.
