Looking for a guide to test if your web push notifications are working or not?
Push notifications are a relatively new marketing tool. So, troubleshooting web push notifications can be a bit of a hassle because it’s challenging to find good tutorials online.
Good news: This article is the only guide to testing push notifications you’ll ever need. Our experts in web push notification software wrote it, and it’ll help you test your push notifications for any browser or operating system.
We use PushEngage as an example in this article, but the tests are universal. So, even if you’re using a different vendor, you should be fine.
PushEngage is the best push notification software on the market. So, if you haven’t yet, you should get started with PushEngage today.
Now, there are a few things to take care of before you can test your push notifications.
Don’t worry. We’ve included all the pre-requisites upfront in this article. Just make sure you follow everything step-by-step, and you should be golden.
Sounds good? Great! Let’s dive in.
What To Do Before You Can Test Your Push Notifications
Testing push notification opt-ins or whether it was even installed correctly can be a pain.
If you subscribe to web push notifications, you won’t get the subscription pop-up again. And that makes it tricky to test the web push notifications.
The simplest way to do your testing is to start with Chrome (any operating system is fine).
Google Chrome is one of the most widely used browsers, and testing compatibility with Chrome becomes super-easy because you can create multiple profiles in Chrome for testing.
To be clear: you can also do the same tests in ANY browser as long as it’s supported by PushEngage (more on this later).
Let’s get busy.
Step #1: Creating A New Google Chrome Profile
You can create new profiles in your Chrome browser to simulate multiple unique user visits to your website.
Every time you visit your site with a different profile, Chrome will automatically simulate a new user. This way, you can test your push notifications for multiple users for all the tests in this article.
So, let’s set up a new profile on Chrome right now!
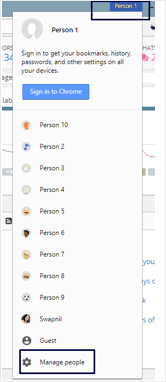
On your computer, open your Chrome browser and sign in to Google. To the top right, you’ll see a user profile. Select your profile image or username and click on Manage People:
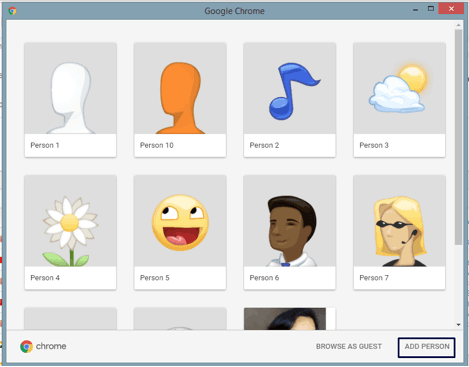
Next, click on Add Person:
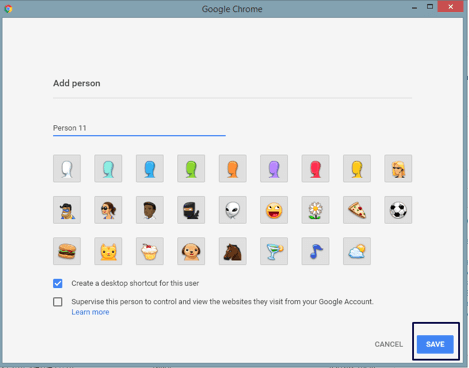
Create a new account and hit Save:
And you’re done. Testing push notifications will be a LOT easier for you now.
Step #2: Check Browser Support for Web Push Notifications
PushEngage supports every major browser and a whole list of website-building platforms. You can check out the complete list of supported integrations to make sure you’re covered.
You should be getting the same support from any vendor. If you’re using a different vendor and don’t get the support for any major browser or platform, you can get in touch with us. Our Customer Success team will help you migrate to PushEngage right away.
Full Disclosure: Browser push notifications are not allowed for certain visitors. For instance, a browser that opens in the Facebook app or any browser that doesn’t support Javascript can’t use push notifications.
But the vast majority of your site visitors will be from popular browsers that do support Javascript. So, this isn’t a major issue.
Step #3: Check SSL Certificate
You don’t need to have an HTTPS website to use PushEngage’s push notifications. But we highly recommend installing an SSL certificate on your website if you haven’t already.
Either way, you can still install web push notifications on your website. Check out our installation guides if you haven’t completed your installation process. The process is slightly different for HTTP and HTTPS sites.
You can add the installation code using Google Tag Manager as well.
But before you test your push notifications, you’ll need to complete the installation process.
Step #4: Enable Welcome Push Notifications
Once you’ve installed push notifications on your site, you should set up welcome push notifications next.
Head over to your PushEngage dashboard and go to Settings » Site Settings » Installation Settings and enable welcome notifications for new subscribers:
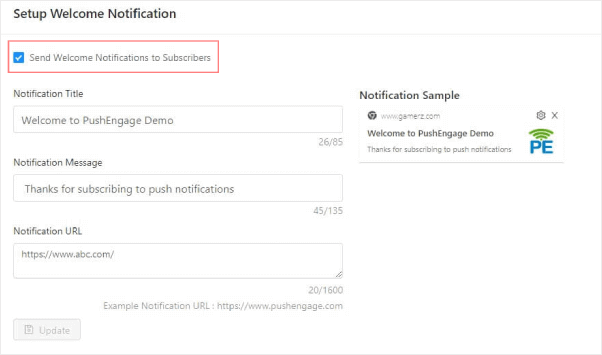
This is a practical step as it helps us validate if a subscription has been completed.
And that’s all you need to do before you dive into testing.
How To Test Web Push Notifications for Your Site
We’re finally going to start testing push notifications for your site.
NOTE: Please don’t jump straight into testing before you complete all the prerequisites for testing. Trust us when we say it; you’ll hate yourself later for skipping it!
Are you done with all the prerequisites?
Very cool.
Let’s get started with the testing now.
Test #1: Using Different Profiles in Chrome
By now, you’ve already created different user profiles on Chrome and set up a welcome notification using PushEngage. So, you should get an opt-in when you visit your site from a new user profile like this one:
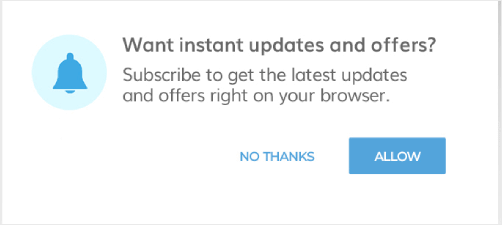
Depending on the type of opt-in you set up, you’ll get either a single-step opt-in or a two-step opt-in. Follow through with the opt-in and if it’s a two-step opt-in, click ‘Allow’ for both opt-ins.
If your push notifications were installed correctly, you should see the welcome notification now.
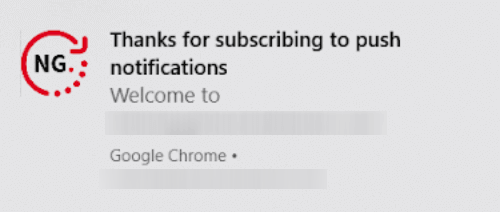
Try this out for at least five different user profiles, to be sure. You could also ask a few of your employees or friends to opt in and test things out.
Test #2: Test To See If Segmentation Is Working
Customer segmentation can play a huge role in your push notification strategy.
And one of the best features you can use on PushEngage is to segment your subscribers when they opt for notifications. This is a great test because it can test your opt-in, the segmentation feature, and your push notifications in one go.
Very cool!
The first step is to head over to your PushEngage dashboard and create two segments. If you’re not sure how to create one or what kind of segments to use, try creating segments based on blog categories or features.
If you’re new to creating segments, you should check out this article on how to create push notification segments.
Once you add the code on your site to tag your subscribers with a segment they opted for, you can go ahead and test the opt-ins.
Share the link with a group of people and ask them to subscribe to your notifications.
Once they are subscribed, you can send push notifications to users of that particular segment. If they receive the notification, your push notifications were installed correctly, and everything’s working fine.
Test #3: Troubleshooting for HTTP Websites
As we’ve said before, you don’t have to have an SSL certificate installed on your site to send push notifications. If you followed the installation instructions and added the code snippet to your site, you should see an opt-in when you visit your site using a new Chrome profile:
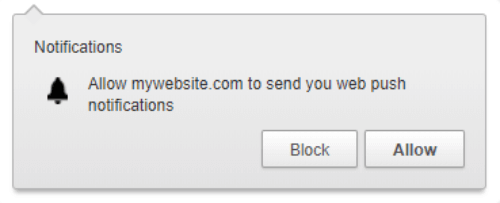
This section of the article is for troubleshooting HTTP sites if you don’t receive an opt-in.
Press Ctrl + U to view the website source code and look for the PushEngage Javascript snippet. This is the same snippet that you got from the PushEngage dashboard and then pasted on your site during installation.
The code should be in the website’s head section as it might not work if you added it inside the <footer> or <body> HTML tags. If you don’t see the code in the head section, that’s your issue right there. Ask your developer to add it to the head section instead.
But if it is in the head section and you still don’t see an opt-in when you visit your site using a new Chrome profile, make sure you are not using any defer tag.
This is what your code should look like:

If the code says:
<script src=”demo_defer.js” defer></script>
Or, <script defer> _pe.subscribe(); </script>
Ask your developer to remove this defer tag from the code, and it should work fine.
Test #4: Troubleshooting for HTTPS Websites
If you’re running an HTTPS website, the first step to troubleshooting is the same as an HTTP website. The code to integrate PushEngage should be present in the head section of the website.
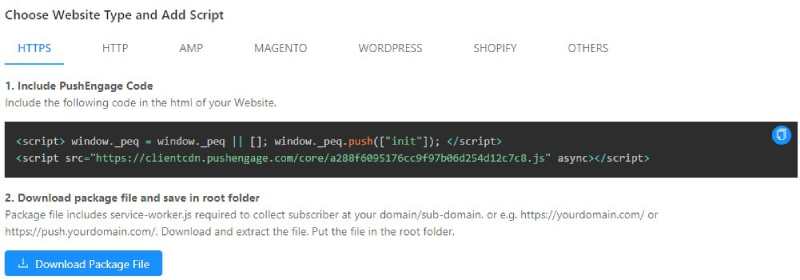
If this code isn’t present in the head section, you’ll need to remove it and add it inside the <head> tag. If that’s not the issue, it could be the service-worker.js file you added during installation.
Head over to this URL (replace your-site-name with your actual site name):
https://www.example.com/service-worker.js
And check if it’s returning a 404 error. A 404 error means that there’s some issue fetching this file, and that’s why you can’t serve push notifications. At this point, you should get in touch with our Customer Success team immediately.
We’ll take a closer look at the issue and help resolve it for you.
But if that’s not the problem either, you’ll need to check your JSON manifest. Head over to this URL (replace your-site-name with your actual site name):
https://www.example.com/manifest.json
If the links are accessible, then you would get results like this:
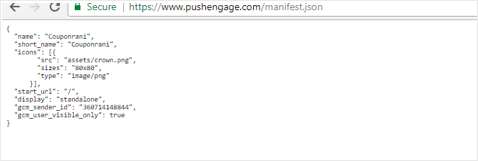
If you don’t get this response, likely, you weren’t able to add the necessary files to the root folder of your site.
No worries, there’s a workaround for that called Quick Install.
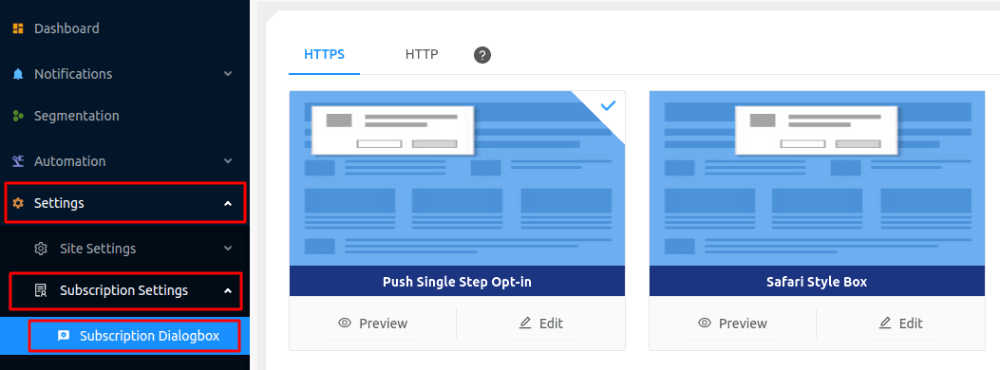
Log in to your PushEngage account and head over to Settings » Subscription Settings » Subscription Dialogbox:
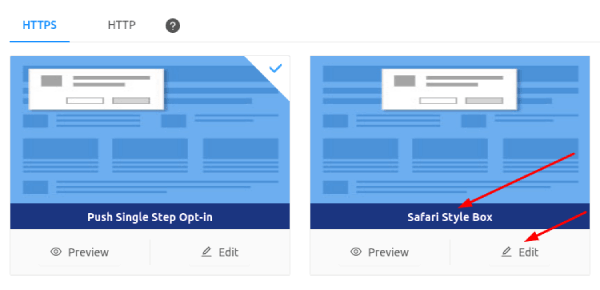
Then go to Safari Style Box » Edit:
Finally, go to Options and enable Quick Install:
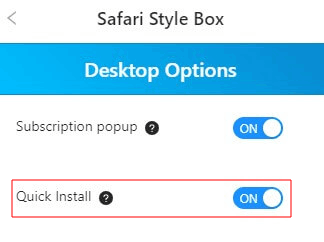
And you should be golden.
Test #5: Using Console to Debug Issues
Warning: This test is only for developers, and it’s meant to be used only when all other tests fail. If you’re not a developer yourself, get in touch with us right away.
Visit your website using a new profile and then press Ctrl + Shift + l (inspect element) and click on Console and type in _pe.subscribe(); in the console window:
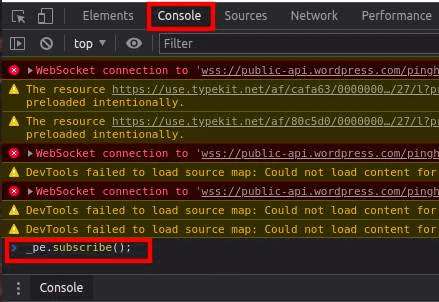
And now press Enter.
You should now see the exact error message that’s stopping the push notifications from working. All you have to do now is debug it.
Wrapping Up
That’s all for this one, folks!
If you found this guide helpful, you should also check out our article on high-converting opt-in examples. It’s the perfect way to set up your campaigns right after you test out your push notifications.
PushEngage offers a lot of really powerful campaigns that you should check out as well. After all, PushEngage is the #1 push notification software in the world. Most of the advanced campaigns are completely automated push notifications.
You could make money on autopilot even while you sleep.
So, if you haven’t already, get started with PushEngage today.
