To get the best out of push notification, you need to create a proper push notification strategy. To support that, you can now use AB testing to know which notification works better and accordingly create notifications.
What Is AB Testing Of Notification?
At PushEngage, we constantly work to make the product feature-rich. We understand the importance of improving the push notification effectiveness for your business and so we have now updated our AB testing feature.
NOTE: A/B testing is only available on PushEngage for the Premium and Enterprise plans. If you’re already using PushEngage and you need to A/B test your notifications, please consider upgrading your account first.
This means you can do AB testing based on:
- Notification content
- Landing page URL
- Large Image & Notification Image
- Multi-Action Button
- Interaction Types

You can also put different UTM parameters for each of the notification. This way you can even track the performance using your own analytics tool like Google Analytics.
How AB Testing of Push Notification Works?
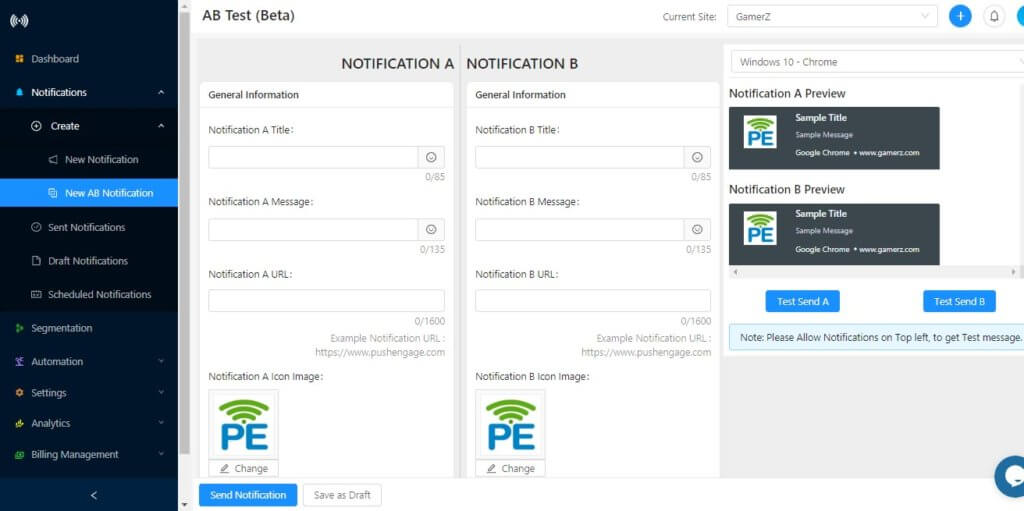
Using AB notification is very simple and straightforward. The AB test feature is available under the New Notification section. In the AB test notification, the number of subscribers is divided equally by the system. When you click on send, half of your subscribers will receive Notification A the other half will receive Notification B.
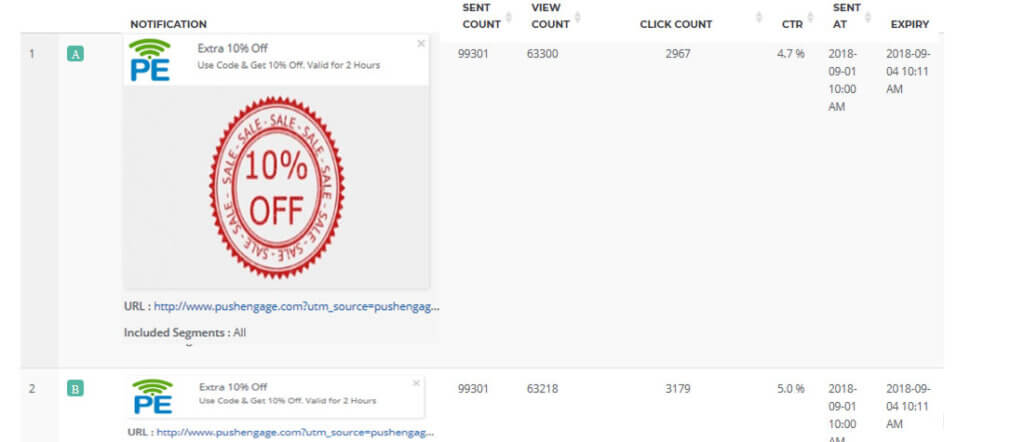
After a couple of hours, check the analytics to see which notification performed well. Based on the result, next time when you send the notification, follow the format of the winning notifications to get better results (more on this later).
This is how traditional A/B testing works. But after our April 2021 update, PushEngage now offers Intelligent A/B testing as an additional option. As the name suggests, Intelligent A/B testing will help you use your push notifications more effectively.
Let’s take a quick look at how it works.
Intelligent A/B testing tests conduct the same test on a small percentage of your total audience. You can change the percentage to suit your needs, but the default setting sends the A/B test to 10% of your audience and then sends the notification that performs better to the remaining 90% of your audience automatically.
There’s no manual involvement here. PushEngage will do all this for you and all you have to do is set it up from the dashboard.
NOTE: You can’t A/B test an entire drip sequence. So, please use A/B testing to either understand your audience’s preferences better or use them only for broadcasts.
Basic Content of Notification
It will have all the details which users will see.
- Title Of the Notification
- Web Push Notification Message
- Notification Icon
- Large Image
- Landing page URL
Notification Settings
In AB Test Notification, you can test notification interaction type:
- Keep open 20 seconds
- Keep notification open until an interaction
A/B Testing With PushEngage –
- Login
Login to your PushEngage Dashboard and navigate to Notifications > Create > New AB Notification.
- Add Details
Then add the notification title, message, URL, and image for Notification A. once this is done you can select another type of notification title, message, URL, and image for notification B. You can try adding a different image or another notification image can be Large Image Notification or with multiple CTA and different texts.
- Submission
Once this is done click on Submit and notification will be sent to your Subscribers.
- Analytics
After some time you can navigate to Notifications> Sent Notification and check which notification out of two has the higher view and click count.

Best Practices For AB Testing –
- Segment your users based on their demographics, buying pattern or site actions. Then you can send A/B test notification. It would help you achieve better results.
- Do not overuse A/B Testing by using it before each and every campaign.
- Plan to run a test with a large number of variants, ensure you are targeting a large audience. It would give you better results.
