Hello, Engagelings.
Exciting news: we just added a new way for you to make more money from PushEngage.
You can now send iOS web push notifications.
Apple has released iOS and iPadOS 16.4, which supports web push notifications for web apps added to the Home Screen on iPhone and iPad devices. Of course, this isn’t necessarily super exciting for everyone, right?
Actually, this means that you can now send web push campaigns to iPhone and iPad users visiting your website.
We’ve also made it super easy to use. A lot of work went into this upgrade and we think that you’ll love it. It’s also a major update, so there’s a LOT to unpack.
Let’s dive in.
What is iOS Web Push And Why Should You Care?
Great news! Web Push Notifications are now supported on Safari, Google Chrome, and Edge browsers for both iPhone and iPad with iOS and iPadOS 16.4.
To get these handy notifications on iOS devices, users need to add your website to their Home Screen first. Once that’s done, they can easily open the Web App by simply tapping on its icon.
The best part is that the web app opens just like any other native app on iOS and iPadOS, providing a seamless experience for users.
Of course, your users will have to opt for your push notifications just like any other type of push campaign. And don’t worry, managing these permissions is a breeze!
Your web app users can easily handle their notification settings, similar to how they do it for any other app on their iPhone and iPad.
So, with this latest update, you can engage and notify your users more effectively on iOS and iPadOS devices using Web Push Notifications. It’s a game-changer for user experience and engagement!
Things to Do Before Sending iOS Push Notifications
To get those web push campaigns up and running on iOS devices, there are a few essential requirements you need to meet:
- Web Application Manifest File: Your web app must serve a “manifest.json” file, and in that file, ensure that the “display” member is set to either “standalone” or “fullscreen.” This step ensures that the web app opens like a native app, providing a seamless experience.
- iOS or iPadOS 16.4 or Later: Your users must have iOS or iPadOS version 16.4 or a later one. This update enables the support for web push notifications on their devices.
- Installation to Home Screen: Users need to install the web app to their Home Screen. To do this, they can tap the Share button, which will open the Share menu, and then select “Add to Home Screen.” Once added, the web app will be readily accessible from their Home Screen.
- User Gesture for Permission: To receive push notifications, the user must grant permission. This requires a user gesture, such as clicking or tapping on a button within the web app. Once the gesture is made, the native permission prompt will appear, allowing the user to permit the receipt of push notifications.
By meeting these requirements, you’ll have those web push campaigns running smoothly on iOS devices, enhancing your engagement and keeping your users informed with ease!
If your website is already a Progressive Web App (PWA), you do not need to make additional updates to prepare for iOS/iPadOS Web Push. If unsure whether your website is a PWA, check with your development team or use Lighthouse in Chrome DevTools.
And if you need a more detailed guide, you should check out our documentation.
What Does This Mean for Your Campaigns?
Now that you’ve successfully completed the necessary steps for iOS and iPadOS web push notifications, it’s time to start sending those notifications using the PushEngage dashboard.
Send Clean Looking Web Push Notifications
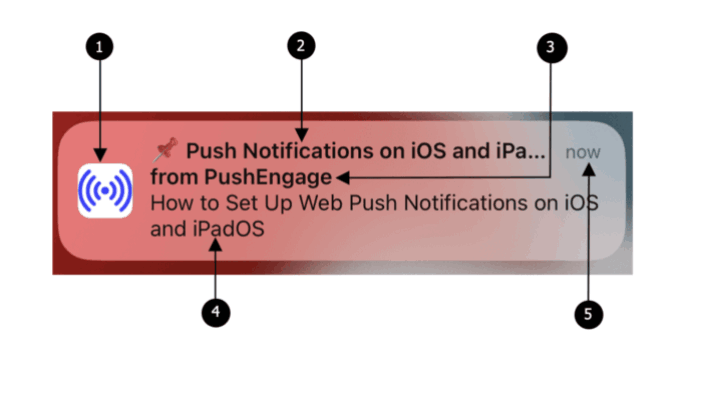
With web push notifications on iOS, the experience is just like other native apps. These notifications will appear as heads-up notifications on the screen, and users can also find them in the notification center and even on the lock screen. So, it’s easy for users to stay updated with your messages!

Web push notifications on iOS and iPadOS come with the following elements:
- Icon: The icon displayed is the one specified in the manifest file. Unfortunately, it can’t be changed for individual messages, so make sure to set the desired icon in the manifest.
- Title: The title of the notification is limited to 30-40 characters. If it exceeds this limit, it will be truncated, so keep it concise and impactful.
- App Name: The app name shown in the notification is the one given in the manifest file. Similar to the icon, it cannot be changed for individual messages.
- Message: The text of the notification is restricted to 120-150 characters. If it goes beyond this limit, it will be truncated. Craft a compelling and brief message to make the most of the available space.
- Timestamp: The notification also displays a timestamp, indicating how long ago the notification was delivered to the user’s device. This helps users understand the recency of the message.
Keeping these elements in mind when creating your web push notifications will ensure that your messages are concise, visually appealing, and effectively engage your iOS and iPadOS users.
When a notification pops up, and you click on it, you’ll be swiftly taken to the specific landing page within the web app. It’s a seamless flow that keeps users engaged and helps them find the content they’re interested in quickly.
Get More Subscribers
A Home Screen web app on iOS and iPadOS requires direct user interaction, such as tapping on a button on the page to display the Subscription Dialog Box for permission. Follow these steps to test that the permission prompt is working:
- Open the web app by tapping the app icon from the home screen on your device.
- Wait for the PushEngage Subscription Dialog Box to appear on the page.
- Click the “Allow” button on the PushEngage Popup modal to display the permission prompt.
- Click the “Allow” button on the permission prompt.
Once you’ve thoroughly tested your popup modals, you’re ready to collect new subscribers.
So, go ahead and make the most of web push notifications on iOS with PushEngage. Keep your users informed, connected, and coming back for more with this powerful and user-friendly feature!
Send More Targeted and Personalized Messages
You can now send web push notifications to a whole new audience. Previously, it was downright impossible to send web push notifications to iOS devices. Until the recent update, iOS didn’t even support this feature.
But now, you can create powerful, high-converting automated web push campaigns for your iOS web app users.
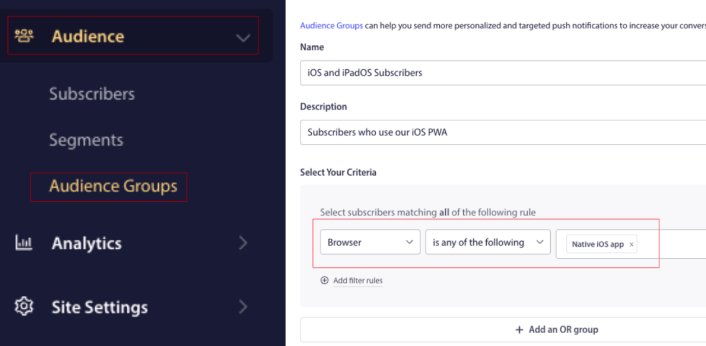
What’s more is that you can create targeted push campaigns by creating an Audience Group for just your iOS and iPadOS users:

So, this means more:
- Repeat traffic
- Engagement
- Sales
And any other business metric that PushEngage is already helping you achieve.
Keep an eye on your numbers in the analytics section of your PushEngage account. We predict that most of you with a PWA will see a rise your engagement numbers.
What Else?
We know that growing a business is hard work. At PushEngage, we’re always looking to improve our product and your experience. We launched this new feature to help you get even more value out of your PushEngage subscription.
Thank you so much for reading this announcement.
If you have any questions, our Customer Success team is here to help. Just start a conversation on Live Chat or check out our contact page.
And thank you for using PushEngage. Whether you’re using the free version or the Enterprise version, you’re just as important to us. The new targeting feature is meant to help you succeed and we wish you all the very best.
Let us know your thought in the comments below and if you haven’t already, get started with PushEngage today!
