Do you want to segment web push subscribers at the time of subscription?
Automatically segmenting your subscribers makes it super easy for you to send personalized push notification campaigns. That way, you can improve clicks on push notifications, in turn driving more returning traffic to your site.
But how do you do it?
In this article, we will show you the exact steps to segment subscribers right at the time of subscription.
We’re going to show you how to do it using PushEngage. PushEngage is the #1 push notification software in the world and you get very advanced segmentation options right from your dashboard.
Let’s dive in.
How to Segment Subscribers Based on URLs
One of the simplest ways to create subscriber segments is to organize leads based on what kind of content they browse.
And this is super easy to set up with PushEngage. Normally, you’d have to use a Javascript API to create segments. With PushEngage, you still have that option, but the easiest way to do it is from your PushEngage dashboard. Head over to Audience » Segments and click on Create a New Segment:
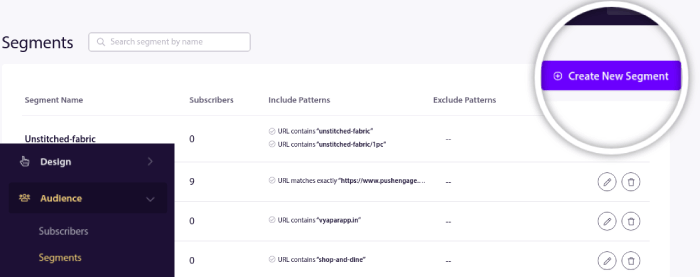
And create a rule that segments your subscribers automatically based on the URLs they’re browsing:
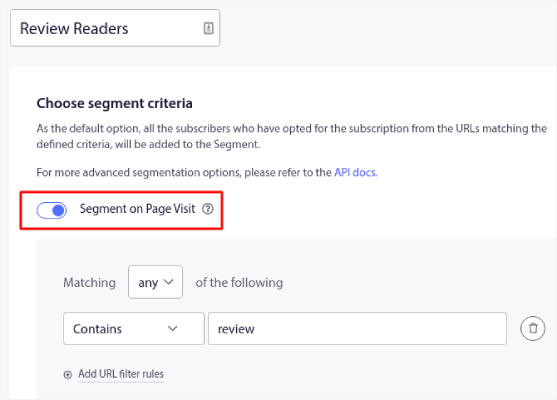
In the example, we created a segment called “Sample Segment” that segments subscribers automatically when they visit URLs on your site with the word “examples” in it. You can pretty much use any keyword you like here.
When you’re happy with the rule, click on Create.
And just like that, you’re done!
How to Segment Subscribers Using Push Notification Opt-ins
You can also segment your subscribers when they subscribe for push notifications by customizing your push notification opt-in.
This is a type of user preference-based segmentation that you can do using PushEngage. You can also call this a User-Driven Segmentation. Here, the subscriber gets to choose one of the two choices they are provided:
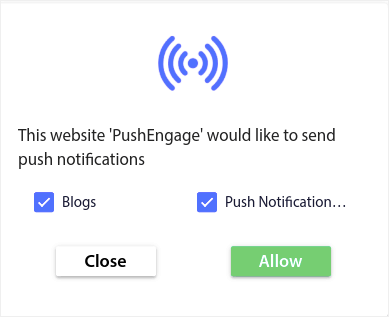
Here’s how it works:
- When any user subscribes PushEngage gets the subscription device ID, Geolocation, and device type
- In this case, PushEngage also collects the user’s preference at the time of subscription, and stores it in a Custom Segment
Let’s get this up and running, now.
The first part is the same as the previous method. You head over to Segmentation and click on Create a New Segment.
NOTE: Don’t click on Segment on Page Visit for this type of segmentation.
After creating the segments go to Design » Popup Modals and create a new Large Safari Style with Segment optin:
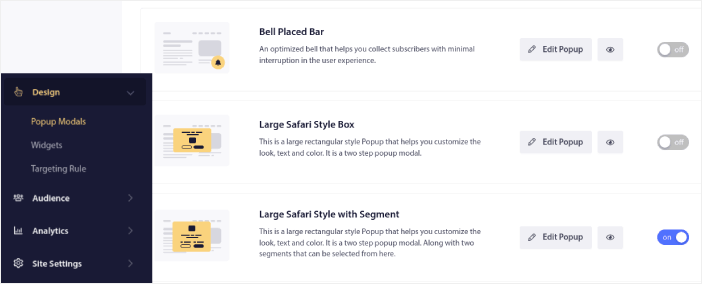
Click on Edit Popup and under the Popup Design tab, design your optin:
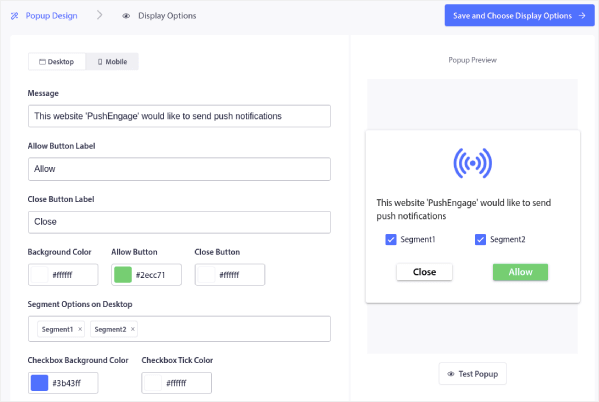
You can customize pretty much everything about your optin here starting from the copy to having your brand colors on the optin. In the Segment Options on Desktop field, you can select the segments you want your visitors to subscribe to.
The beauty of this optin is that the same subscriber can choose to subscribe to multiple segments right from the popup.
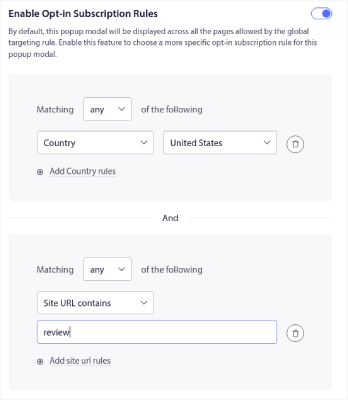
Scroll down to Enable Opt-in Subscription Rules and you can configure when you want your push notification optin to show up.
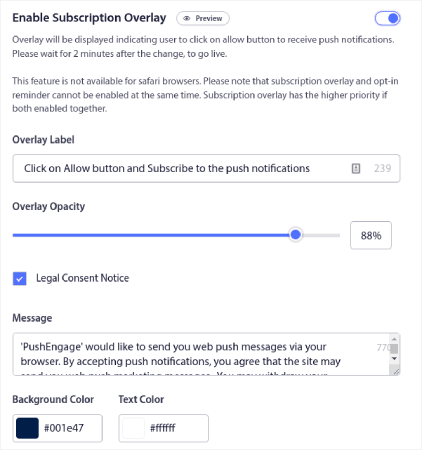
You can also create a Subscription Overlay with a Legal Consent Notice:
When you’re done, click the Save and Choose Display Options button. There, you can set up when the optin shows up by creating a delay after a visitor lands on a targeted page.
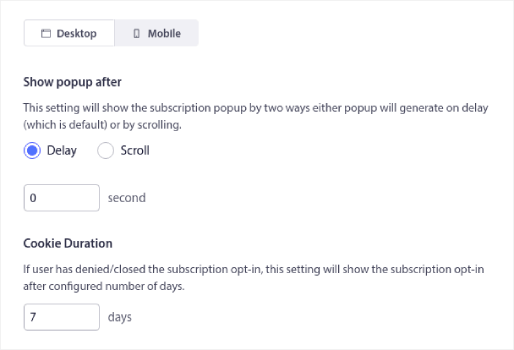
When you’re done just hit the Save and Enable Popup:

That’s really all! There’s no need for any code. If you followed every step exactly, you should see the push notification opt-in with segments on your site.
What to do After You Segment Your Push Notification Subscribers
That’s all for this one, folks!
Segmentation is a great push notification strategy. Before you sign up with any push notification service, make sure to check out their audience segmentation features.
While you’re at it, you should also check out these epic resources as well:
- How to Set Up Abandoned Cart Push Notifications (Easy Tutorial)
- How To Schedule Push Notifications the Easy Way [5 Min. Guide]
- How to Create Price Drop Notification Campaigns In < 10 Min.
We recommend getting started with PushEngage. PushEngage is the #1 push notification software in the world and you get extremely powerful segmentation features right out of the box.
So, if you haven’t already, get started with PushEngage today.

This was a very useful article. I will apply the instructions you have given on my website in the PushEngage settings.
Thank you.