Most visitors don’t come back. But that’s where WooCommerce push notifications come in.
They let you reach shoppers after they’ve left your site — no email, no phone, no creepy tracking. Just real-time, personalized messages that drive action.
- Cart abandoned? Send a reminder.
- Order confirmed? Send an update.
- Sale going live? Notify your customers instantly.
In this guide, you’ll learn how to set up WooCommerce push notifications in minutes and turn missed opportunities into repeat customers.
Send WooCommerce Push Notifications Today!
Push notifications are a super effective, low-cost marketing tool to help you grow your repeat traffic, engagement, and sales on autopilot.
- What Are WooCommerce Push Notifications?
- Why You Should Use WooCommerce Push Notifications
- What Can You Do With Push Notifications on WooCommerce?
- #1. Instantly Alert Customers & Admins About New Purchases
- #2. Welcome Push Notifications
- #3. WooCommerce Push Notifications to Recover From Cart Abandonment
- #4. Store Browse Abandonment Push Notifications
- #4. Cross-Selling WooCommerce Push Notifications
- #5. Get Recurring Sales From WooCommerce Push Notifications
- #6. WooCommerce Push Notifications for Order Updates
- How to Set Up WooCommerce Push Notifications
- What to Do After You Set Up WooCommerce Push Notifications
What Are WooCommerce Push Notifications?
WooCommerce push notifications are short, clickable messages sent directly to your visitor’s browser — even after they’ve left your site. They work on Chrome, Firefox, Edge, and Android. No app needed. No email required. No phone numbers necessary.
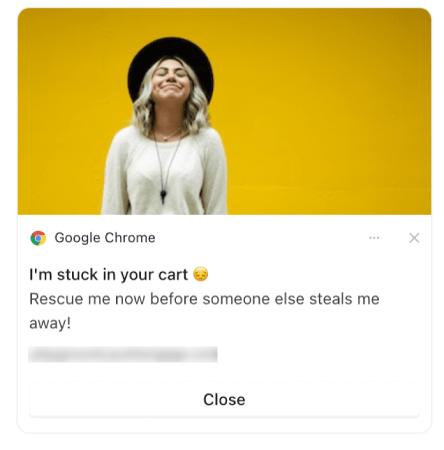
Why They Work:
- 📲 Show up in real time instead of getting buried in an inbox
- ✅ Opt-in only — no personal info needed
- 🔥 4x higher click-through rates than email
- 🛡️ Privacy-first marketing tool with no creepy data tracking
It’s like having a direct line to your customers. Just faster. Simpler. And way more effective.
Why You Should Use WooCommerce Push Notifications
Push notifications can be a powerful tool to increase your repeat traffic, engagement, and sales. You can use WooCommerce push notifications to grow your business rapidly. The best part about WooCommerce push notifications is that they are easy to set up and quite easy for even startups to afford.
There are three primary goals of any eCommerce business:
- Increase push notification subscribers
- Get repeat traffic on autopilot
- Improve conversions
And you can do all of that fairly easily if you’re running a WooCommerce store. Here’s an example from WickedWeasel:
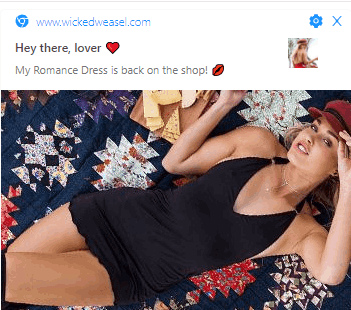
WickedWeasel Makes $2K-4K a week using eCommerce push notifications. There’s absolutely no reason why you can’t do it too.
Launching WooCommerce push campaigns can be a pain. There are tons of details that you have to take of manually such as variables and tags that help trigger the campaigns. And then, you’d have to manually insert the code into your website’s code without wrecking it.
But eCommerce push notifications are incredibly powerful tools to grow your revenue and average order value at very low costs. Unless you have to hire a developer to do it for you, of course.
Good news, though: PushEngage has a WooCommerce integration so that you don’t need a developer to integrate our API into your WooCommerce store anymore. Anyone can create and launch WooCommerce push campaigns now.
What Can You Do With Push Notifications on WooCommerce?
WooCommerce push notifications aren’t just for promotions. With PushEngage, you can set up smart, automated campaigns that run in the background and bring users back at the perfect moment.
Let’s check out some of the most powerful WooCommerce push notifications and how you can set them up quickly.
It doesn’t matter how big your push notification subscriber base is. You can still use WooCommerce push notifications to grow your business. Your push notifications can redirect your subscribers to:
- An abandoned shopping cart
- New blog post, podcast, or video
- New offers or sales
- Surveys, polls, and feedback forms
PushEngage is the #1 push notification software in the world. And it’s super easy to set up welcome notifications using PushEngage. You can check out the full list of features in our review of PushEngage. Or, you could also take a look at the best push notification services in the world and choose the right one for you.
Or, you can simply get started right away with PushEngage.
#1. Instantly Alert Customers & Admins About New Purchases
When you’re launching new products or restocking a popular item, timing is everything. WooCommerce push notifications let you reach users as soon as new products hit your store.
Customers receive immediate confirmation of their order, reducing uncertainty and improving satisfaction. Store admins get real-time alerts to start processing orders without delay.
Automate the process with 1 click!
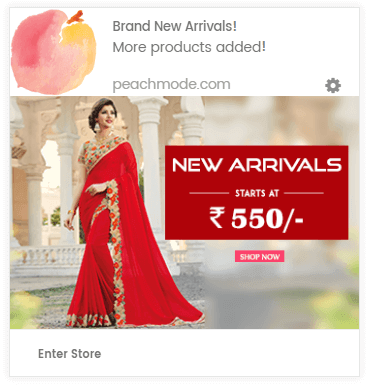
Not only can you announce new product arrivals in real time, but you can also personalize these notifications based on a customer’s browsing history or past purchases. That means a shopper who previously viewed a product will receive an alert the moment it becomes available again.
Why It Works:
- Urgency: Limited-stock items or special offers create a sense of urgency, pushing customers to act quickly.
- Personalization: Sending targeted alerts makes your messages feel more relevant, increasing conversion rates.
- Real-time Engagement: Instant notifications ensure that users know about your latest items when they’re most likely to make a purchase.
You can even send instant updates to your admin team so that they’re always on top of every order placed. SMS is usually too expensive as a channel for real time order updates for a fulfilment team. But push notifications are super cost effective.
The best part? With PushEngage, sending both admin and customer notifications is as simple as installing a plugin and clicking on a toggle button. The campaigns are already done for you. Just turn it on!
#2. Welcome Push Notifications
Whether you have a new store or an established one, website welcome messages are absolutely essential. Welcome push notifications are great for:
- Confirmation: You want to confirm that your new subscriber is indeed subscribed to your web push notifications.
- Re-engagement: Welcome campaigns are a great way to get your subscribers to come back to your site.
- Sales: You can give your new subscribers a welcome offer with discounts, freebies, and coupons.
Let’s create a welcome push notification campaign now. Head over to your PushEngage dashboard and go to Campaign » Drip Autoresponders » Create New Drip Autoresponder:
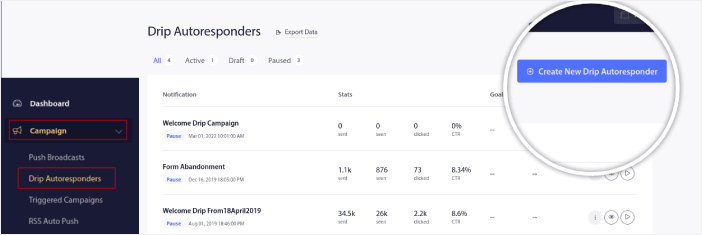
Give your drip campaign a name that you can easily remember. Then, set the first push notification to go out immediately after a visitor subscribes to your push notifications.
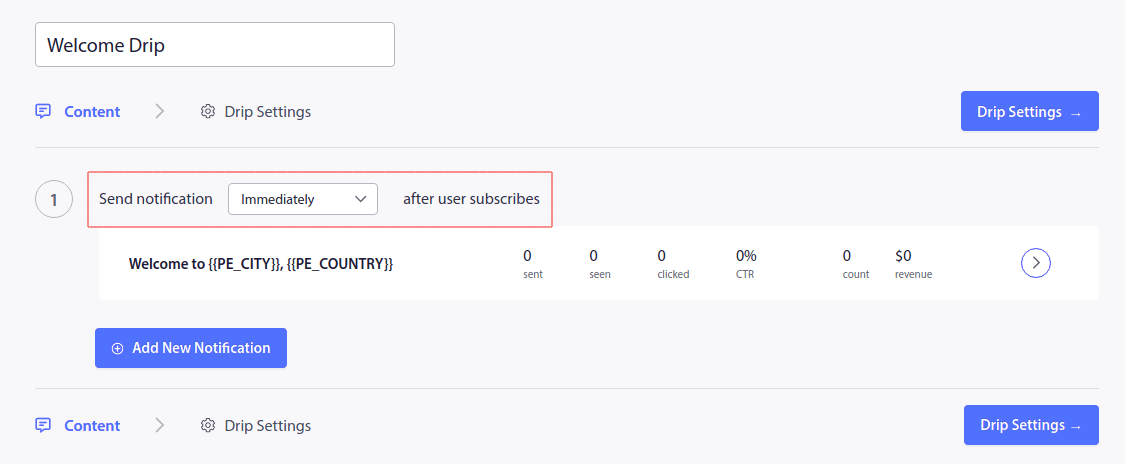
You can edit the notification to create custom content for your welcome message. When you’re done, click the Add New Notification button to add more notifications to the sequence. You can edit the new notifications and set a custom delay between each notification.
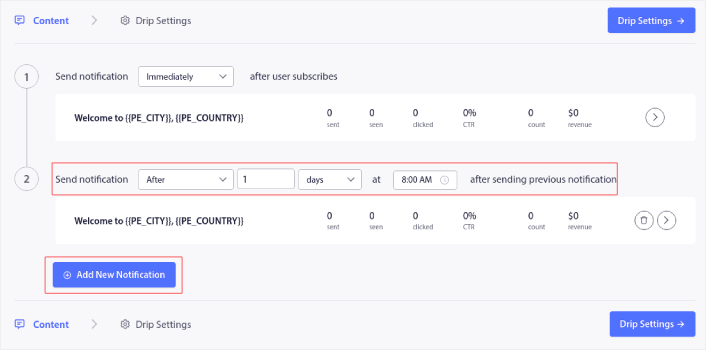
You can add as many notifications as you like, but we recommend creating a welcome drip with 5-7 notifications.
After that, select your audience in Drip Settings:
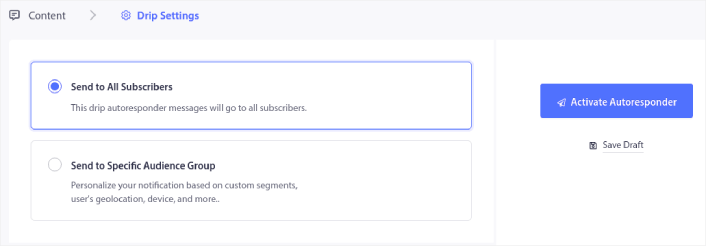
You can send different welcome drips for different segments by using the Send to Specific Audience Group option. This is especially useful when you’re segmenting visitors when they opt for push notifications. When you’re happy with your targeting, click on the Activate Autoresponder button. And you’re done!
#3. WooCommerce Push Notifications to Recover From Cart Abandonment
Tired of seeing potential sales slip through your fingers? Install our WooCommerce push notification plugin and recover lost sales on autopilot. Get set up in 10 minutes with a few clicks and no coding.
Shopping cart abandonment is when a potential customer adds a product to the shopping cart and doesn’t complete the checkout process. In other words, they abandon your products for some reason and simply move on.
Online shopping cart abandonment can be due to a significant problem in the user interface or a lack of trust, or even some hidden charges. If you’re running a new store, then you should check out our article on how to reduce shopping cart abandonment.
Simply enable the campaign by switching the Enable Cart Abandonment toggle button and selecting the trigger from the Select Trigger dropdown.
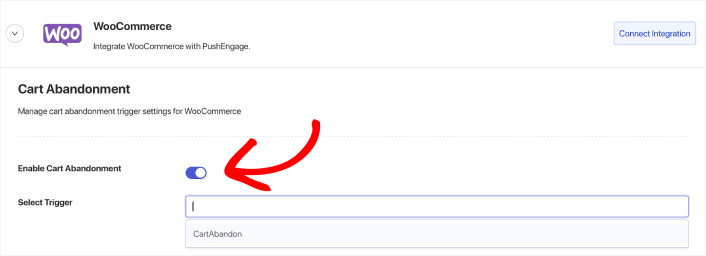
The same goes for your Browse Abandonment campaign. Simply create the trigger and then activate the campaign by switching the Enable Cart Abandonment toggle button and selecting the trigger from the Select Trigger dropdown.
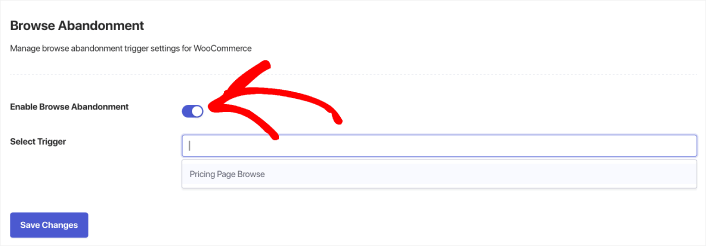
If you don’t have a browse abandonment campaign or a cart abandonment campaign built, you can go ahead and do it now.
With any other WooCommerce push notification plugin, you’ll need a developer to create eCommerce campaigns. But PushEngage comes with a direct WooCommerce integration. All you need to do is create a new campaign under Triggers.
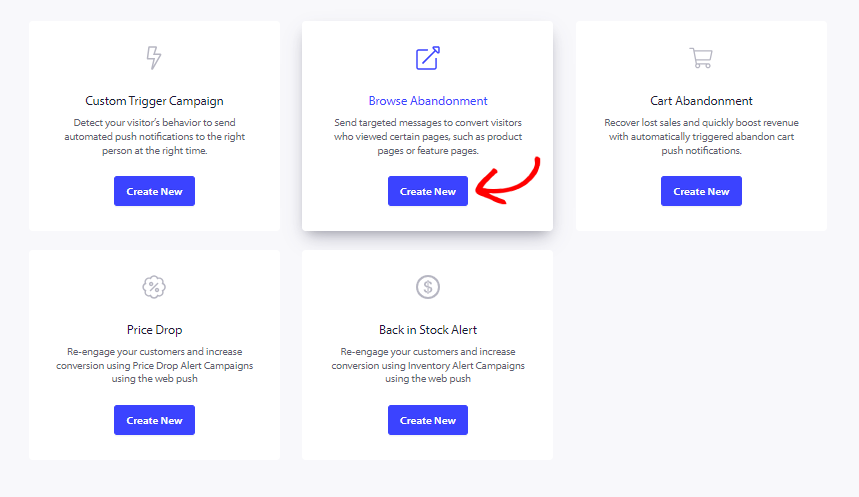
Next, go ahead and create your Browse Abandonment and Cart Abandonment campaigns.
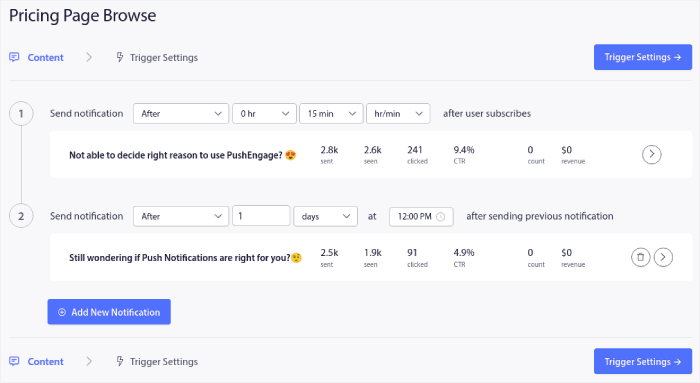
Finally, hit the Save button. And that’s it! PushEngage will automatically recover your lost sales for you now.
#4. Store Browse Abandonment Push Notifications
A browse abandonment notification is an automated push notification that gets sent when someone browsing your website decides to bounce without taking any action. Sending the visitor a reminder that they were interested in something on your website can hugely increase your conversion rates.
Browse abandonment campaigns are most commonly used by eCommerce sites. But that’s not to say that a travel portal or a news site (or any website, really) can’t use them.
A browse abandonment notification ends when your visitor adds something to their cart. After that, a cart abandonment notification takes over to convert them into paying customers.
That’s where browse abandonment campaigns come into play. Using the browse abandonment email examples in this article, you can target, convince, and convert:
- Customers who added a product to a Wishlist, but not their Cart
- Customers who viewed a product more than once
- Customers who browsed more than 3 products in the same category
- Customers who searched the site for a specific product
- Customers who stayed on a product page for at least 3 minutes and didn’t buy
If you followed along with the previous section on setting WooCommerce push notifications for cart abandonment, you’ll see that it’s the exact same process for browse abandonment campaigns as well.
#4. Cross-Selling WooCommerce Push Notifications
Cross-selling is selling related or complementary products to a customer. It’s one of the most effective methods of marketing. You can easily increase your Average Order Value (AOV) using cross-selling campaigns.
According to Amazon, 35% of its sales come from cross-selling. Cross-selling push notifications are campaigns that automatically cross-sell products to your customers. Cross-selling push notifications help you increase sales as you’re 60-70% more likely to sell to an existing customer.
It’s also super easy to set up a cross-selling campaign using WooCommerce push notifications.
- Create segments based on product categories and add a customer to the relevant segment when they make a purchase
- Identify products to cross-promote under each segment
- Create a drip notification for each segment and send the relevant product or product list to cross-promote
It’s as simple as that.
Head back to your PushEngage dashboard and go to Audience » Segments and create your segments:
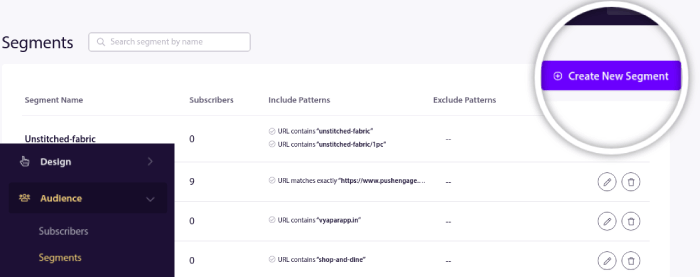
You’ll want to segment your visitors when they visit a product in a specific category:
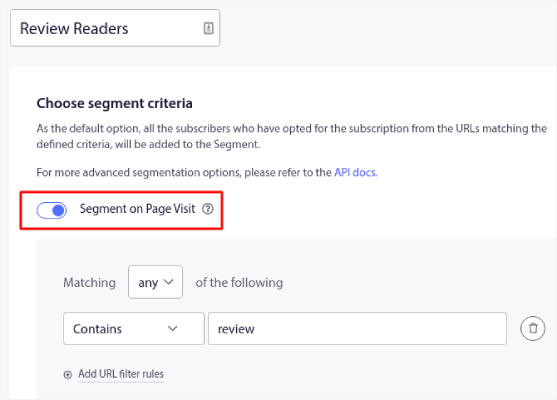
Then, find a product to cross-sell for each segment and create a drip autoresponder to promote it.
#5. Get Recurring Sales From WooCommerce Push Notifications
You can schedule push notifications to repeat every week. Or every few days. Loads of PushEngage customers use repeat scheduling and they absolutely love this feature. It’s made an especially significant difference for WooCommerce sites.
Why would you use repeat scheduling?
Imagine that you have a weekly sale for a flea market. Or a weekend sale. Or a stock clearance sale. Or even a monthly flash sale.
These are live events that keep repeating like clockwork.
Do you honestly want to create a different push notification every week? Especially if you know ahead of time that these sales are going to be a major part of your marketing strategy?
Or, would you rather just create the notification once and schedule it to fire off every week at a fixed time?
That’s exactly what recurring push notifications can do for you. It’s the perfect way to save a lot of time and energy. Instead of wasting time with new notifications, you can simply keep optimizing the existing campaign.
It’s also really easy to do. Just head over to the PushEngage dashboard and create a broadcast under Broadcast Push:

Then, create a new push notification to send. Customize the content under the Content tab:
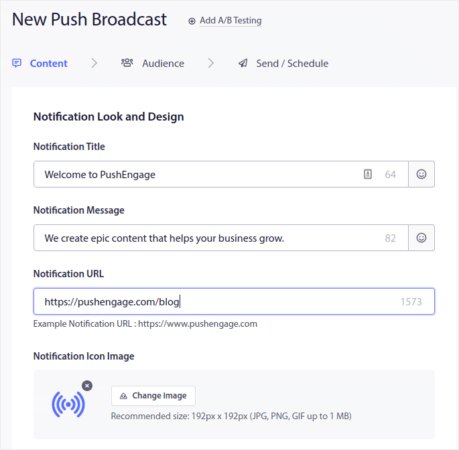
Next, select your audience under Audience:
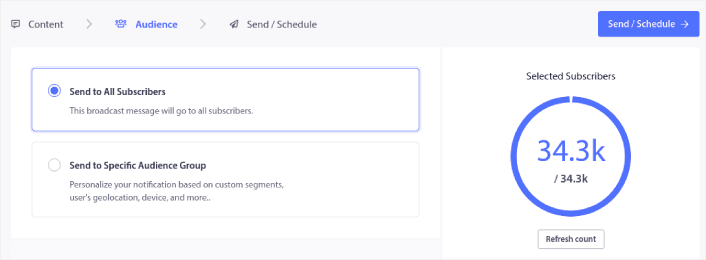
And finally, under Send/Schedule, you can schedule the notification as a recurring push notification:
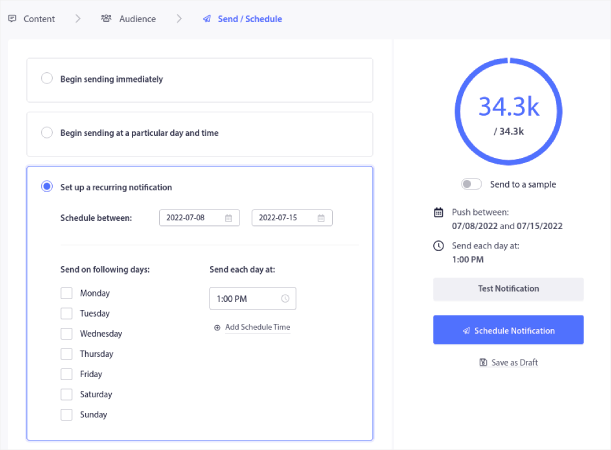
You can easily create any schedule you like for your push notifications including custom days, dates, and times.
#6. WooCommerce Push Notifications for Order Updates
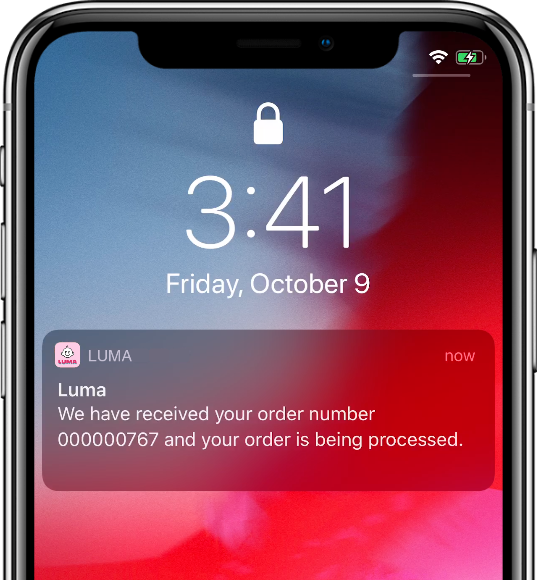
WooCommerce push notifications are super flexible. So, you can use WooCommerce order update notifications to do a LOT of different things. If you’re using PushEngage, you get prebuilt campaigns that allow you to:
Keep Customers Engaged While Processing New Orders
Let customers know when their order is being packed and prepared for shipping. This builds excitement and reduces support queries. At the same time, you can send an instant alert to your team members for seamless internal communication during fulfillment.
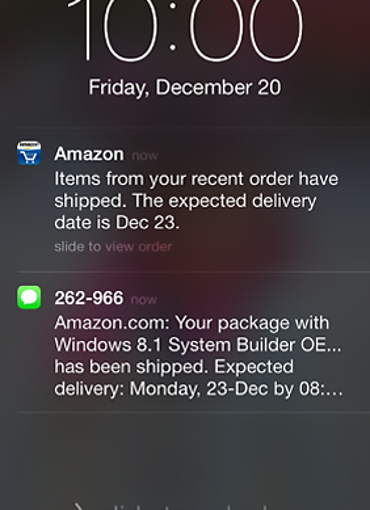
Provide Shipping Confirmation The Second It Leaves Your Door
Send customers an automatic notification the moment their order leaves your warehouse. Include tracking details for added convenience. Let your customer support team know about shipping confirmations in real time as well.
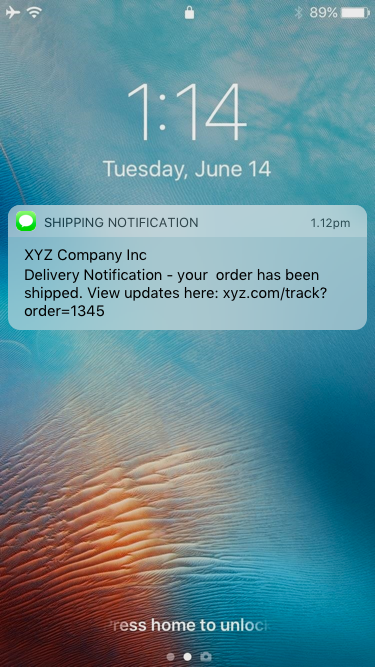
Notify Customers When Their Order Gets Delivered
Keep customers in the loop by confirming successful delivery. Reduce post-purchase anxiety and improve overall experience.
- Reduce ‘Where’s my order?’ tickets – Keep customers informed in real-time.
- Higher open rates than email – 80%+ push open rates vs. 10-20% for email.
- More cost-effective than SMS – No per-message fees, but usage depends on your PushEngage plan.
- 1-click setup – No coding. Just enable and go.
- Improve internal workflows – Notify your team instantly about new, failed, or refunded orders.
Alert Admins and Customers Instantly About Payment Failures, Refunds, & Cancellations
Prevent lost sales by notifying customers when a payment fails and providing an easy retry link. Store admins can take quick action to assist the customer. Lose fewer orders due to payment errors and improve your Average Time to First Response!
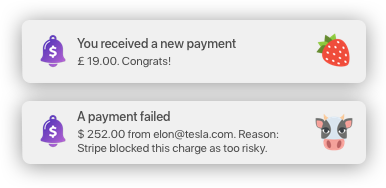
Ensure transparency and build trust by immediately notifying customers when a refund is processed or an order is canceled. Also alert your customer support team that a refund or a cancellation has been issued.
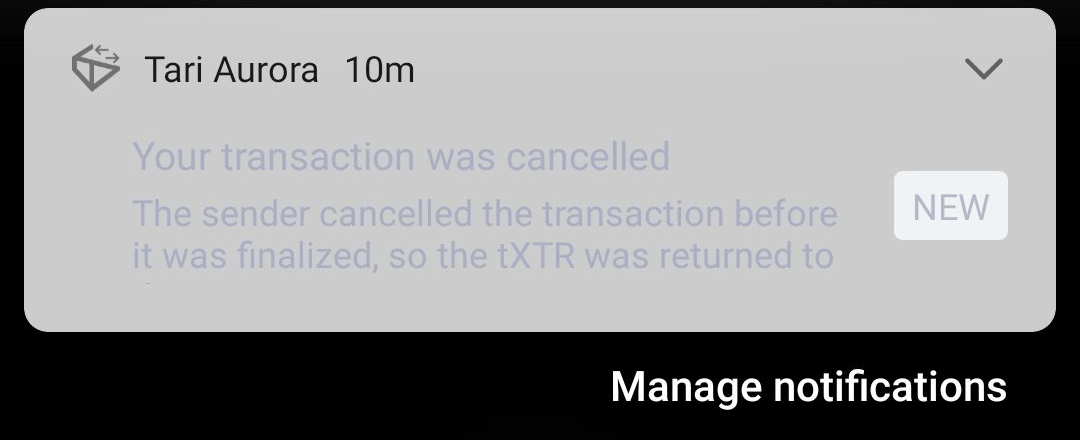
Get More Customer Reviews Automatically With the Tap of a Toggle Button
Boost social proof by reminding customers to leave a review a few days after delivery. Push notifications have a much higher response rate than emails!
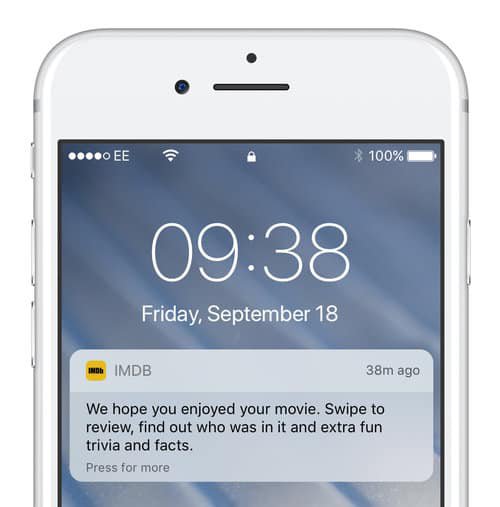
Recover Failed and Abandoned Purchases With a Quick Nudge
Remind customers who had a failed payment or an abandoned checkout to complete their order with a seamless 1-click return.

Why It Works:
- 1-click return to cart or checkout
- Real-time alerts when the moment is hot
- No email or login required
These recovery campaigns are some of the highest-converting automations for any WooCommerce store, and they’re privacy-friendly by design.
How to Set Up WooCommerce Push Notifications
If you’re using PushEngage, you get two types of WooCommerce push notifications:
- WooCommerce trigger campaigns: These include cart and browse abandonment campaigns. PushEngage comes with pre-made automation for these campaigns. All you have to do to enable them is customize the campaign notifications and flip on the toggle switch.
- WooCommerce order notifications: Order notifications are instant notifications sent to admins and customers for every touchpoint and order status. These notifications are already built for you. You just need to activate them by clicking on a toggle button.
It’s super simple to launch WooCommerce trigger push campaigns now. Here’s a quick video tutorial to help you get started:
Or, if you prefer step-by-step written instructions, you can simply follow along.
Simply enable the campaign by switching the Enable Cart Abandonment toggle button and selecting the trigger from the Select Trigger dropdown.

The same goes for your Browse Abandonment campaign. Simply create the trigger and then activate the campaign by switching the Enable Cart Abandonment toggle button and selecting the trigger from the Select Trigger dropdown.

If you don’t have a browse abandonment campaign or a cart abandonment campaign built, you can go ahead and do it now.
With any other WooCommerce push notification plugin, you’ll need a developer to create eCommerce campaigns. But PushEngage comes with a direct WooCommerce integration. All you need to do is create a new campaign under Triggers.

Next, go ahead and create your Browse Abandonment and Cart Abandonment campaigns.

Finally, hit the Save button. And that’s it! PushEngage will automatically recover your lost sales for you now.
But these aren’t the only WooCommerce push notifications you can send. You can also send order notifications to your admin team and your customers.
You can navigate to WooCommerce » Settings Push » Notifications tab:

Under this tab, you can go ahead and toggle all the notification type which you want to enable for now. This field also lets you decide that if you want to send to admin only or customers.

In both cases, the store visitors or admin will only get the push notifications only when they will be a subscribed or opted in for receiving campaigns.
You can choose if the recipients for the campaign would be admin or customers. Once you have chosen that, you can go ahead and manage these campaigns.
You can choose the campaign you would like to edit and click on Manage Button.

You can scroll down to the checkbox that enables you to send a push notification to admin when the action is completed.

You can decide to choose specific people to get the campaigns when an order is placed or the purchase fails. You can choose roles that should be getting campaigns.

You can set up default campaign title & message along with URL. For example – In new order placed campaign, you can have variables like Order ID & Order Date for more specific details of every new order placed.
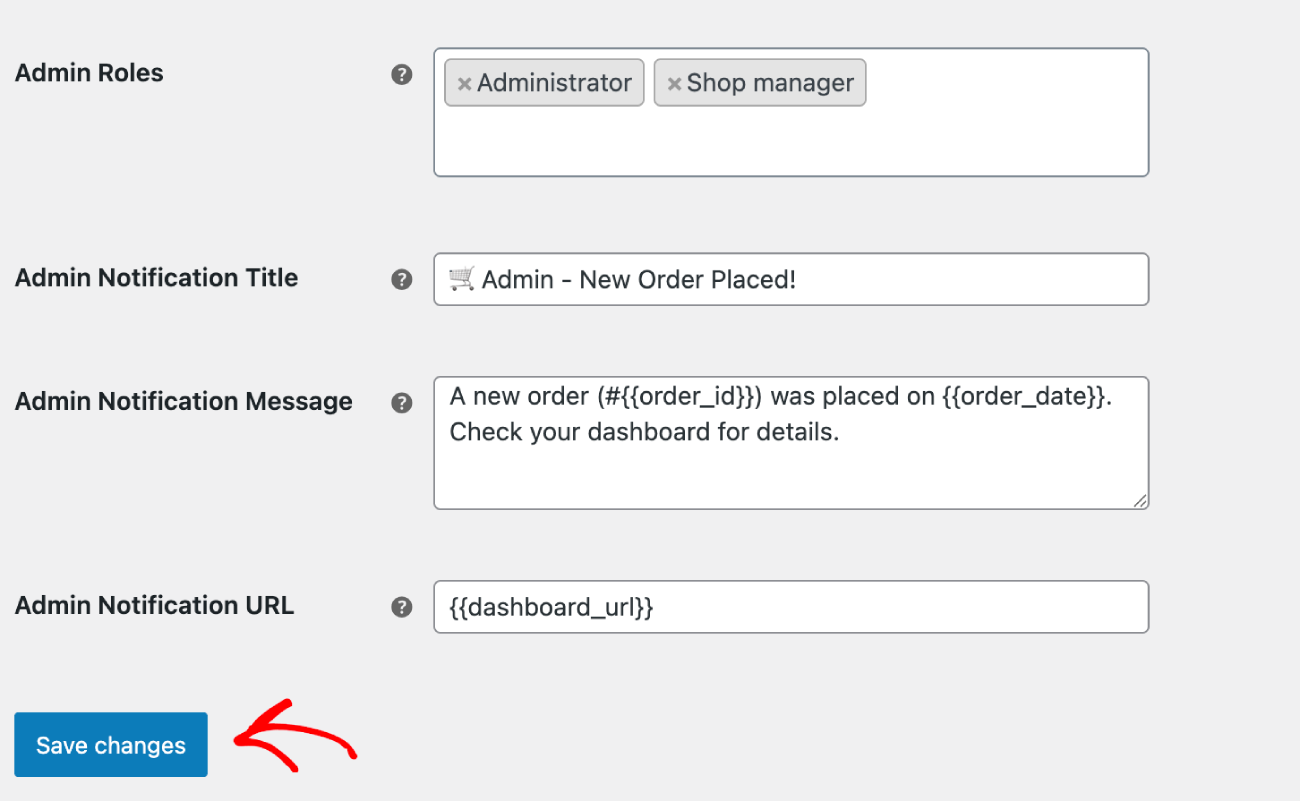
If you want to send out push campaigns to your website visitors or customers. You can either send out default campaigns available in the WooCommerce Settings or you can design your own campaigns using Push Broadcasts, Drip Autoresponders. We also have some Automated Campaigns created for you which is goal-oriented campaigns.
You can choose the campaign you would like to edit and click on Manage Button. You can check the box that enables sending campaigns to customers. For example, here we are setting up Push Notifications for Retry Purchase Request.
Set up the notification Title & Message along with the checkout page URL.
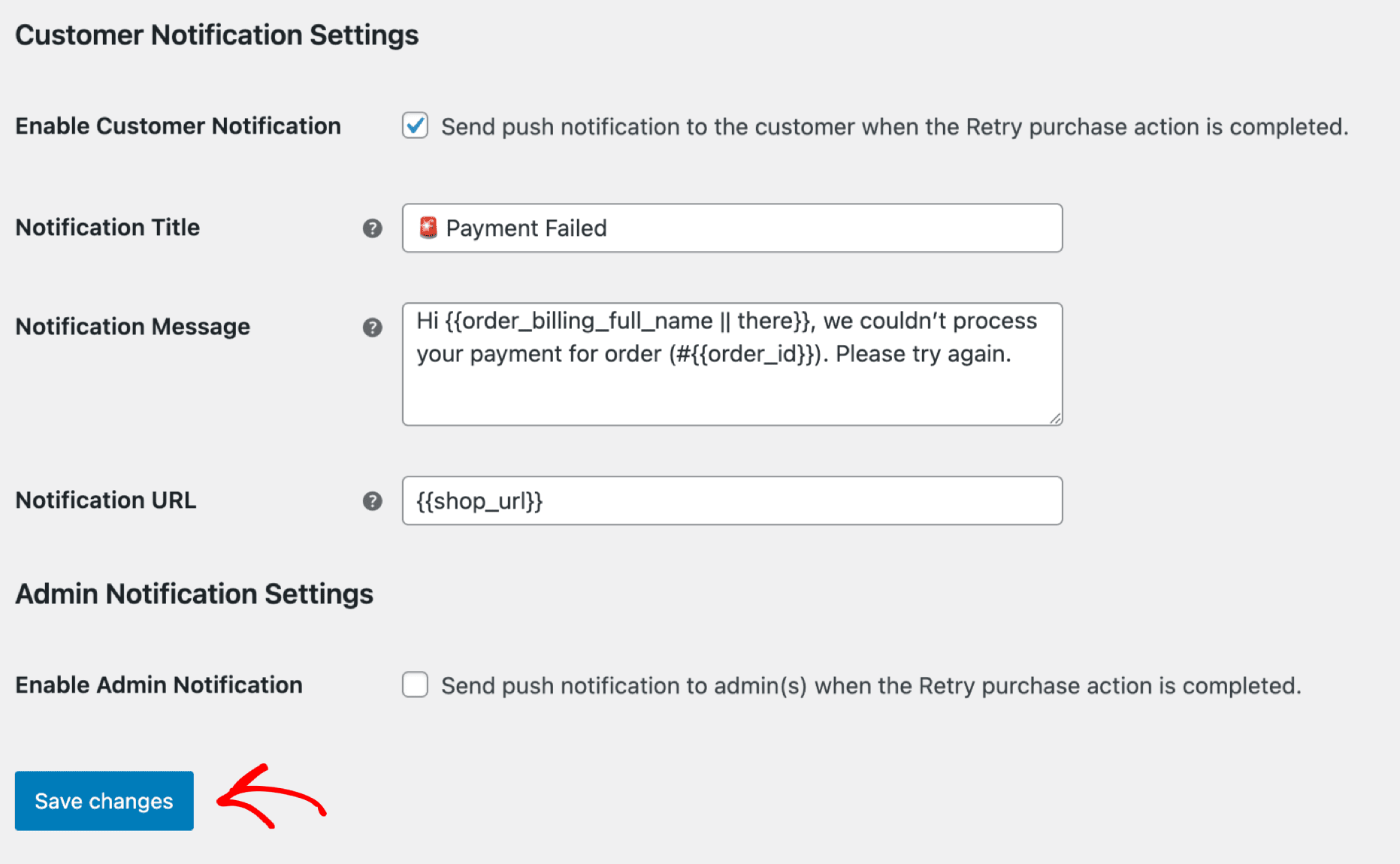
Once you have updated the details, you can click on Save Changes Button.
What to Do After You Set Up WooCommerce Push Notifications
Now that you know how to send WooCommerce push notifications, you should start setting up the marketing campaigns immediately. The worst thing for you to do is sit on the idea and wait for your traffic to grow all on its own.
As you’ve already seen, push notifications are a great tool for growing traffic, engagement, and sales.
Not convinced? Check out these amazing resources on push notification campaigns:
- How to Convert Subscribers To Buyers Using Web Push Notifications
- How to Notify Subscribers of New WordPress Posts
- How to Send Back-in-Stock Notifications to Get More Sales
- How to Clean Up Push Notifications Subscriber Lists (Easy)
- How to Automatically Send RSS Push Notifications
- How to Use Push Notifications to Promote a News Site
- How to Use Cross Selling Push Notifications to 2x Your Sales
- How to Use Browse Abandonment Push Notifications (4 Steps)
We recommend using PushEngage to send your push notifications.
PushEngage is the #1 push notification software in the world. So, if you haven’t already, get started with PushEngage today!
