Rich push notifications would be the future of marketing…
If they weren’t already so popular.
Chances are that your competitors are using rich push notifications right now. So, if you’re wondering how rich notifications can help you grow your business, this is the right article for you.
We’re going to walk you through all the benefits and show you how you can create your own rich push notification campaigns. Exciting stuff, right? Let’s dive in.
What Are Rich Push Notifications?
A rich push notification is a push notification that also includes media attachments and interactive elements. You can send a notification with a few hundred characters of text in total. But you can also make your push notifications much more interesting using images, videos, audio clips, and even multiple call-to-action buttons.
But really, rich push notifications are a great way to express things that you simply can’t with a text message.
Here’s a quick example:
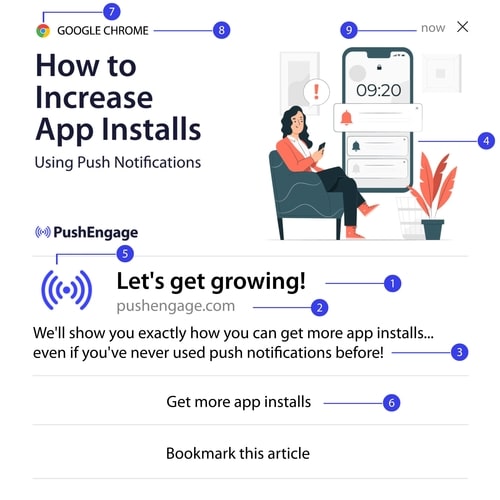
As you can see, there are 9 parts to a rich push notification.
Some of these elements are part of any push notification. The rich part comes from the large image (4) and interactive buttons (6).
This may seem like a very small difference, but it’s really not.
We’ll talk about some actual examples of rich push notifications in a later segment.
For now, let’s understand the basics of a rich notification more deeply.
What Media Types Can You Use In Rich Push Notifications?
Different platforms allow for different types of rich media attachments.
iOS supports images in JPEG, GIF, PNG formats, audio clips in AIFF, WAV, MP3, M4A formats, and videos in MPEG, MPEG2, MP4, AVI formats. You can also include alternative text for a rich notification in iOS. That way, if someone doesn’t have rich notifications enabled, they can still see a meaningful push notification from you.
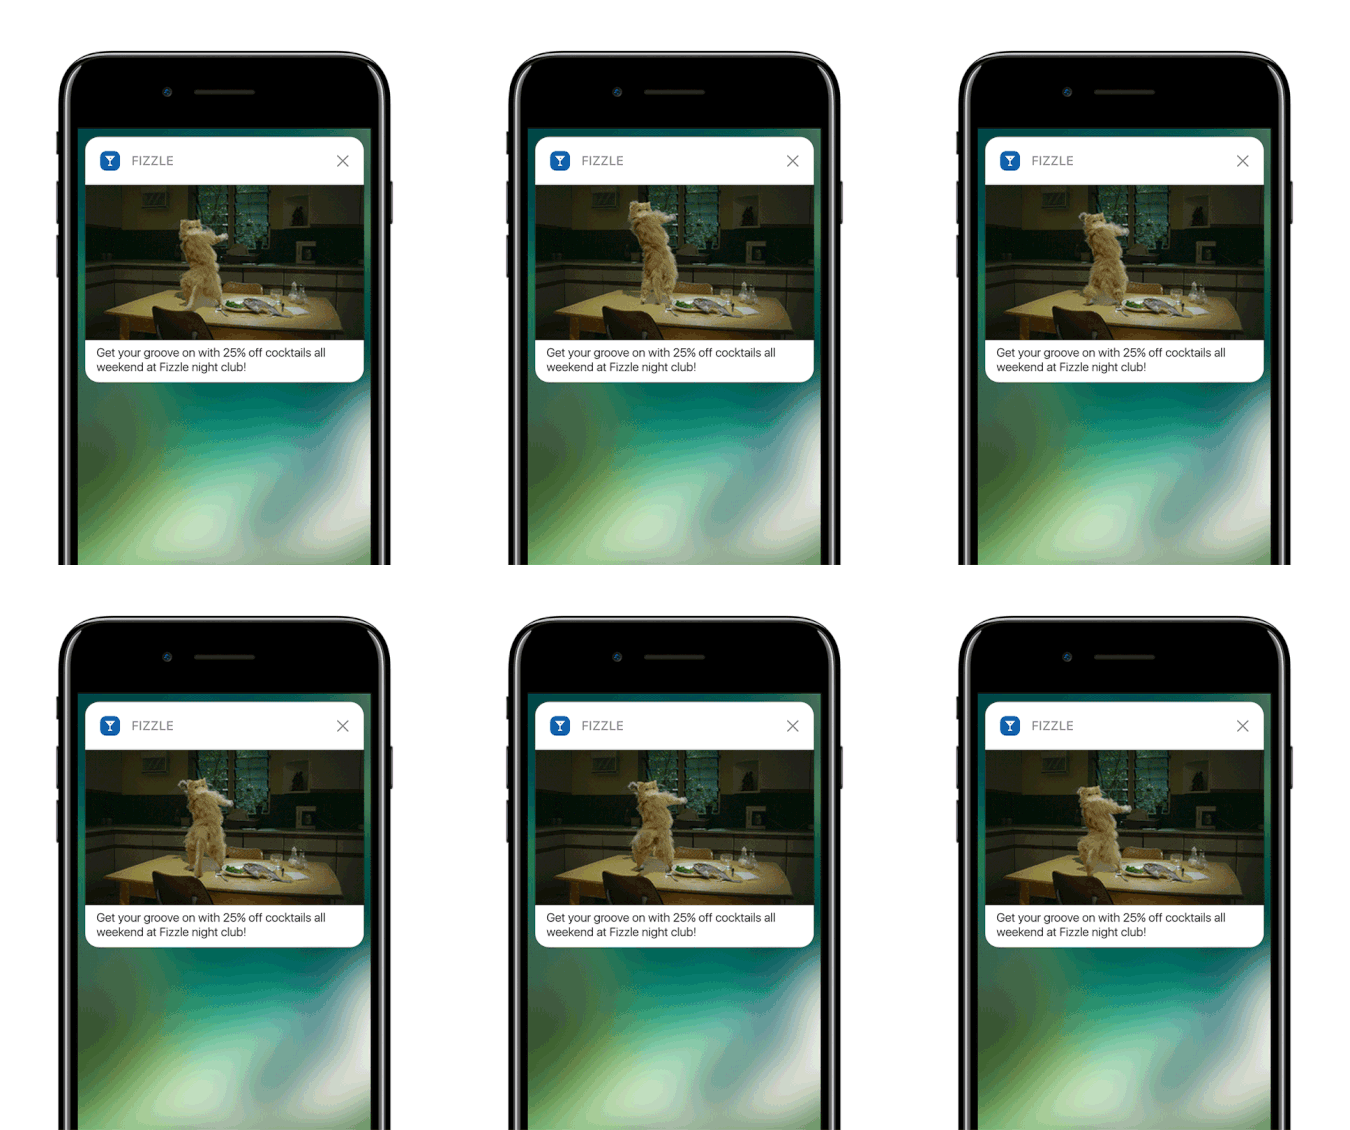
Aww! Ain’t that kitty cute?
Android and web push notifications are way more limited. You can only send out image attachments in PNG and JPEG formats.
Pro-Tip: Use images that are 360 px wide and 180 px high. That’s the best resolution for your rich media. You can upload bigger images with the same aspect ratio, but it may cause some distortions when it’s sent out to different browsers.
Why Use Rich Push Notifications?
Now that we understand what you can do with rich push notifications, let’s dive into why you should use them at all.
Rich notifications can be used to:
- Grab attention very quickly with images, sound clips, and videos
- Improve user engagement with websites and apps alike
- Understand user interests and segment them for higher click rates
- Convert users immediately with the help of interactive buttons
- Stand apart from your competition with more visually compelling content
Let’s take a look at 3 real examples of rich notifications and what they can achieve.
#1. How Swarm Uses Rich Push Campaigns
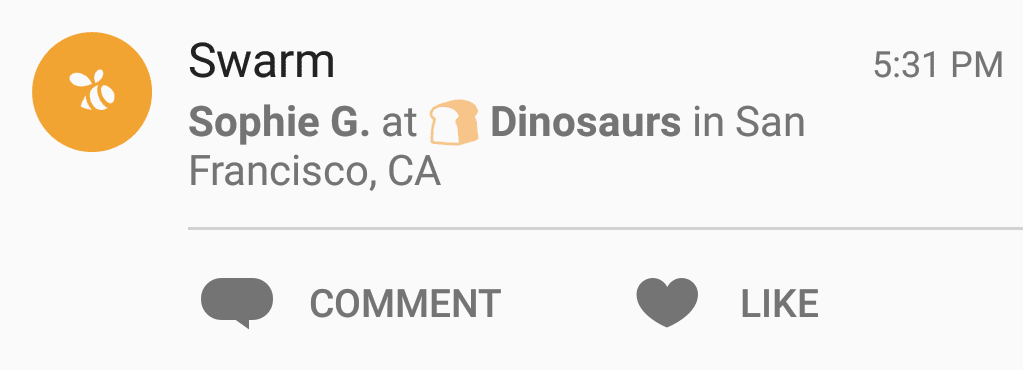
This push notification gets sent to you when your friend walks into a new location nearby. The interactive buttons allow you to react to a real event in real-time.
It’s a really innovative way to attract customers to new locations.
#2. How Buzzfeed News Uses Rich Notifications

Buzzfeed did an amazing job with a simple text notification with a fresh twist.
Emojis! Yes, you can use emojis in your push notifications too. It’s a really simple way to grab attention.
If you notice, there are no fancy images or videos here. Just emojis. Now, try reading the same message without emojis.
See the difference?
#3. How Peachmode Uses eCommerce Rich Notifications
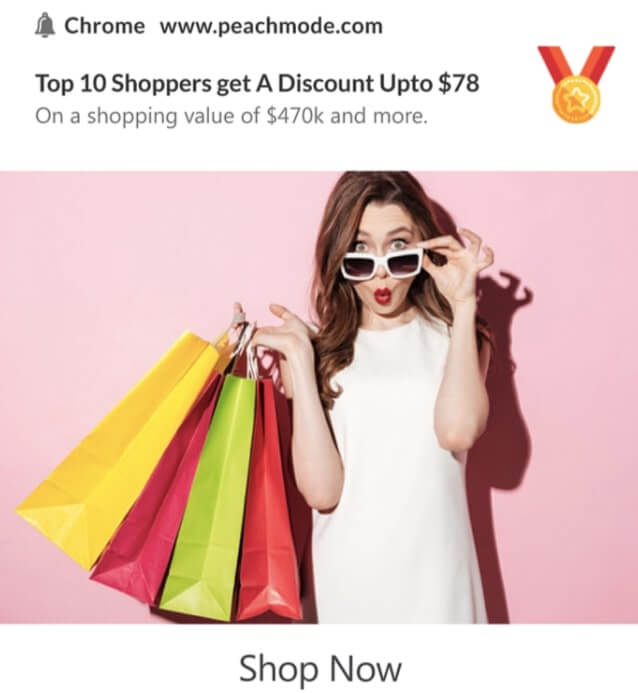
See the huge image in the push notification? That’s a stock image, but it makes all the difference in the world.
It’s chic and perfectly describes their ideal customer.
Couple that with the offer and it’s really one of the most creative push notifications we’ve seen.
How to Set Up Rich Push Notifications Yourself
It’s actually really easy to create rich push notifications. In fact, there’s nothing fancy about it at all. Let’s check out how to do it on PushEngage.
We recommend using PushEngage to get started with your push notification campaigns. PushEngage is the #1 push notification software in the market and we’re using it for the walkthrough up next.
Head over to your PushEngage dashboard and go to Campaign » Push Broadcasts and click on the Create a New Push Broadcast button:

Under the Content tab, add your push notification content:
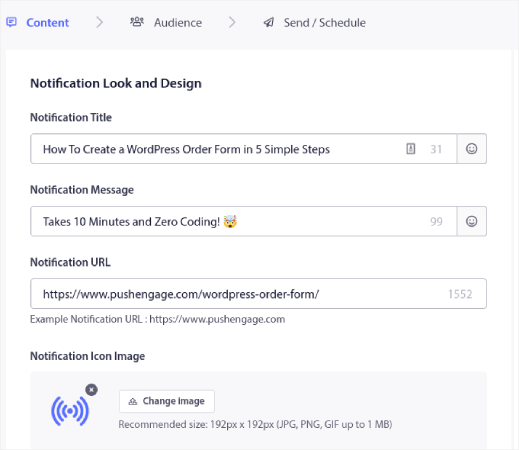
And you can set up an A/B test to increase your click rates or you can schedule your push broadcasts to get more views. In either case, you should check out our push notification best practices for the best results.
And that’s all! You’re done.
What to Do Before You Send Rich Push Notifications
Before you start sending push notifications, you’ll need to set up a subscription opt-in for your website. Your opt-in will convert web visitors into push notification subscribers. So, this is a critical element.
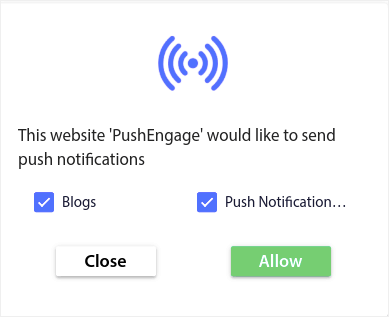
The cool bit about PushEngage is that you can set up multiple push notification popup modals. If you need some inspiration, you can check out this article on high-converting push notification opt-ins.
How to Create a Push Notification Popup Modal
A push notification popup modal is a small window that appears on top of a website or mobile app interface to display a message or notification to the website visitor.
The popup modal can be triggered by various events. You can set up popups to get triggered on page visit, on scroll depth, and even on custom actions such as button click.
Usually, you’ll see a call to action on the popup modal such as “Subscribe” or “Allow” to get consent from visitors to send them push notifications. If you follow this tutorial, you can create a popup like this one:

You can create popup modals that can segment subscribers directly or create regular popups that simply collect subscribers with the default attributes such as geolocation and browser.
Head back to your WordPress dashboard. Go to PushEngage » Design:
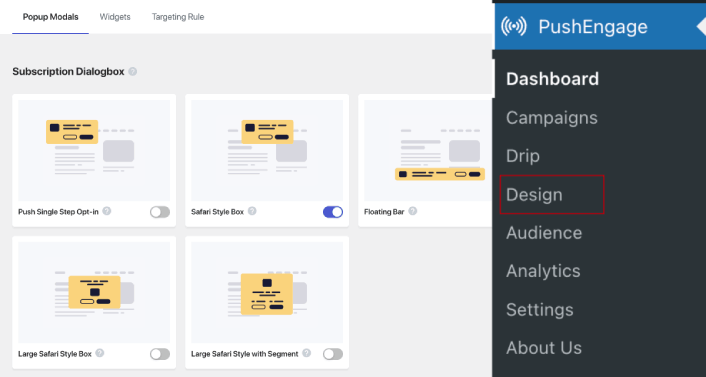
And you can set up as many popup modals as you please. Of course, you can make sure that they get triggered at different times under Display Options for each popup modal.
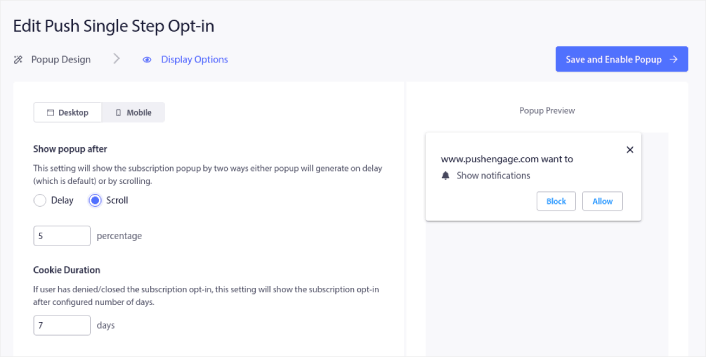
The idea here is to give your visitors a solid reason to subscribe. If you need some help with that check out our article on how to create a custom push notification opt-in.

And if you want to create more targeted popup modals, you can use the targeting rules under the Targeting Rule tab:
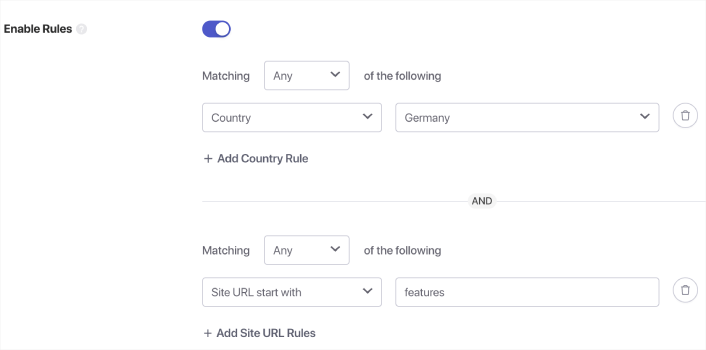
These are global targeting rules and will get preference over targeting rules for individual popup modals. But if you wish, you can create robust targeting rules for each modal by editing them.
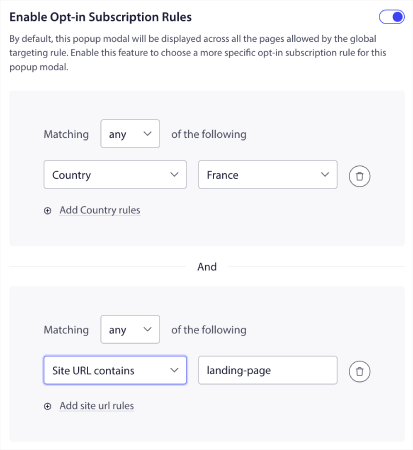
For instance, you can create popup modals in different languages to target visitors from different countries.
Once you’re done setting up the opt-in, your site can collect subscribers. But how do you even know that your opt-in is working properly? The sensible thing to do is set up a welcome push notification.
How to Send Rich Push Notifications to Welcome New Subscribers
Head over to your PushEngage dashboard and go to Campaign » Push Broadcasts and click on Choose from Templates:
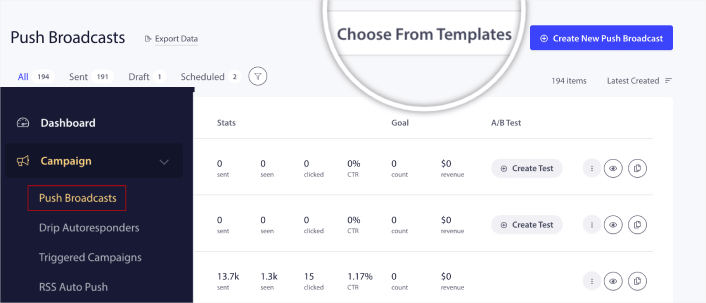
Next, you can select a template to get started with from the library:
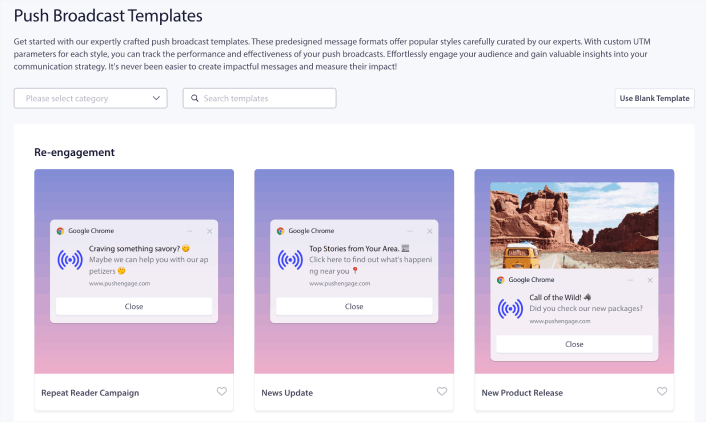
Simply hover on any of the templates and click the Use Template button to create a new push broadcast using that template:
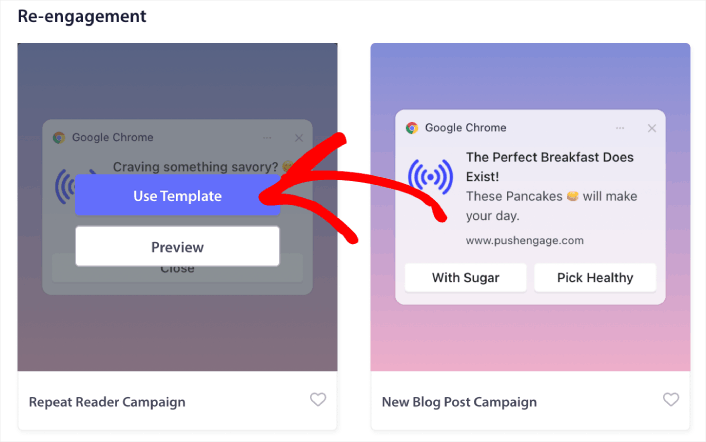
When you use the template, it will automatically fill out all the fields you need to create a new push broadcast by fetching it from the template. Of course, you can edit all the fields to suit your brand more. But you can also send out the broadcast as is if you like. You’ll find all the push notification examples in this article as a template to get started with.
The best part is that you get a ton of proven push notification templates that you can use right out of the box.
Pro-Tip: You should spend some time on a full-scale test of your push notifications. This will troubleshoot the most common problems and you won’t waste your time trying to resolve issues later on.
What to Do After You Send Rich Push Notifications
That’s all for this one, folks!
If you found this article helpful, be sure to drop a comment below.
Getting started with push notifications can seem intimidating. But if you keep an eye on goal tracking and analytics, you should be fine. More importantly, you’ll make a lot more profit with the help of push notification campaigns. Here are a few cool resources to get you started:
- How to Use Retargeting Push Notifications to 2x Your Revenue
- How to Sort Your Push Notifications and Find Winning Campaigns
- How to Clean Up Push Notifications Subscriber Lists (Easy)
- How to Automatically Send RSS Push Notifications
- How to Use Push Notifications to Promote a News Site
- How to Use Cross Selling Push Notifications to 2x Your Sales
- How to Use Browse Abandonment Push Notifications (4 Steps)
And you can even send app push notifications to complement your web push notifications and PWA push notifications.
You can already create automated push notifications using PushEngage. Once we roll out app notifications, you’ll be able to send web and app push notifications right from your PushEngage dashboard. Soon, we’ll be adding more features and media formats that will blow your mind.
So, if you haven’t already, get started with PushEngage today.
