Looking for a quick and easy way to sort push notifications and find your best performing campaigns?
Sorting your push campaigns by performance metrics helps you understand what works and what doesn’t. More importantly, you can use your best campaigns as a base for new campaigns.
The sorting feature isn’t standard for all push notification services. Even if you get the feature, you might not be able to use it without using their API service. Which means that you’ll need a developer to do it for you.
If you have an in-house developer, that’s fine. But if you don’t, we highly recommend shifting to PushEngage. PushEngage allows you to filter your campaigns in a few simple clicks.
In this article, we’re going to show you step by step how to sort push notifications and find your best campaigns.
Why Would You Want to Filter and Sort Push Notifications?
You can filter and sort push notifications to find the best performing campaigns or even your worst performing campaigns.
The epic thing about these filters is that you can see:
- Types of push notifications that you send the most
- How well specific types of notifications perform
- Identify seasonal trends in campaign performance
- What kinds of campaigns need to be optimized immediately
And you can do it in a few simple clicks!
You can also sort the push notifications by Latest Created or Oldest Created. This way, you can make it super easy to find specific campaigns even after your filter by a date range.
Does Your Push Notification Service Allow Campaign Sorting?
Not every push notification service allows you to filter and sort push notifications. At least, not directly. Sometimes, you can do it using their API service. But that’s difficult to do if you don’t have an in-house developer.
A good way to verify is by simply asking your service provider if they have a cleanup option. But chances are that they won’t have one with accessible options.
We recommend that you switch to PushEngage right away.

PushEngage is the best push notifications service in the world. And we’re not just talking about the free version. It allows you to connect with visitors after they leave your site with targeted push messages.
PushEngage is our first choice for push notification services and tools because it’s:
- It’s so easy to use
- Effective on HTTP and HTTPS sites
- Comes with a visual builder which requires little to no coding to set up
- Easily set up fully automated push notification campaigns for any kind of site
- Has multiple options to send personalized push notifications for higher click rates
- Equipped with custom goal tracking, UTM parameters, and advanced analytics
And this is barely scratching the surface. Check out PushEngage’s full list of features before you go any further.
The most incredible part about PushEngage is that it has a forever-free plan that you can try out before making a purchase decision.
PushEngage’s free plan is good enough to get your business to a point where you can easily afford the paid plans that start at $9/month for 100,000 subscribers.
The overall switching cost is pretty low. So, we highly encourage you to switch to PushEngage right away. The cleanup feature isn’t the only reason to buy a PushEngage plan. You get a lot of advanced features that other push notification tools simply don’t offer.
How to Filter and Sort Notifications Quickly
Now that you’ve switched to PushEngage, it’s time to clean up your push notifications subscriber list.
If you’re new to tracking push notification performance, we have some really great news for you. You can sort and filter your push broadcasts easily.
Head over to your PushEngage dashboard and go to Push Broadcasts:

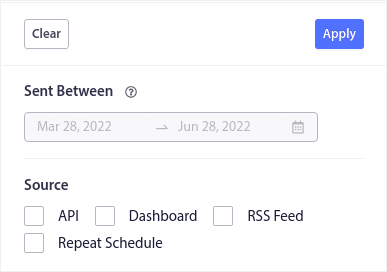
Here, you’ll notice that there’s a filter option:

You can filter the push broadcasts you sent out by date and source:

Let’s say that you have a Black Friday push notification campaign spanning multiple days.
Now, you can get a clear picture of which notifications performed the best and which ones aren’t performing too well. And this information can help you optimize your current broadcasts and campaigns.
If you’re new to using push notifications, you should know that you can only A/B test push broadcasts. But you can use the sorting and filtering options to apply optimizations to even your automated campaigns. It’s a really neat way to set up push notification best practices for your industry and brand.
What to do After You Sort Push Notifications
After you sort your push notifications, you can look into detailed analytics and then get back to optimizing your push notification campaigns and growing your business.
We also suggest that you take some time to read our articles and learn how to supercharge your automated push notifications. Start with our article on push notification best practices.
If you’re new to push notifications, you should follow a full-blown push notification testing process before you go live. It’ll help you troubleshoot common issues before your visitors see them and start complaining about a broken user experience. And most definitely you should set up Google Analytics to track push notifications.
Retargeting push notifications to target the subscribers who clicked on them or didn’t. Let us know how that works for you. In the meantime, check out these resources:
- How to Boost Clicks on Your Push Notifications With Curiosity
- How to Personalize Each Push Notification
- How to Stand Out With Rich Media in Your Push Notifications
- How to Reactivate Dormant Push Subscribers
- How to Use Push Notifications to Keep Customers Informed
- How to Use Emojis in Your Push Notifications for Higher Click Rates
- How to Increase Conversions by Creating a Sense of Urgency
And if you haven’t already, get started with PushEngage.
